# 📚 About the Bootcamp

Learn about the general information of the bootcamp and the structure of bootcamp modules.

<figure><img src="https://2688244615-files.gitbook.io/~/files/v0/b/gitbook-x-prod.appspot.com/o/spaces%2FqpKohKlriBQm0I9cc9k5%2Fuploads%2FhjtJCYFvBFAlvsrD8KXQ%2Fimage.png?alt=media&amp;token=ec6c4f56-bb1b-4aa5-ae39-9acb3bbf8143" alt=""><figcaption></figcaption></figure>

Open Polkadot Bootcamp, created by **OpenGuild Labs**, is designed to educate learners on all aspects of the Polkadot protocol and development within the Polkadot ecosystem.

All the resources and materials provided in this bootcamp is open for public uses as far as they are credited.&#x20;

### About OpenGuild

<figure><img src="https://2688244615-files.gitbook.io/~/files/v0/b/gitbook-x-prod.appspot.com/o/spaces%2FqpKohKlriBQm0I9cc9k5%2Fuploads%2FQENvXWpG0lE9D6Ess1xU%2Fimage.png?alt=media&amp;token=e4e4bff7-afae-469f-8951-5838965bf22b" alt=""><figcaption></figcaption></figure>

OpenGuild is a Web 3.0 builder-driven community elevating Polkadot. We find & connect talents to become a part of Polkadot to create value, products, and culture in SEA market. Our primary focus is to cater to builders/organizations seeking a comprehensive understanding of the Polkadot blockchain, providing curated, in-depth resources, engaging activities & events.

OpenGuild Community is run by the OG Core Team, a team of dedicated long-term contributors focusing on expanding market entries and enhancing builders/organization awareness & collaboration for Polkadot in Southeast Asia.

Learn more about OpenGuild&#x20;

* OpenGuild Website: <https://openguild.wtf/>
* OpenGuild Github: [https://github.com/openguild-labs](https://github.com/openguild-labs/openguild-gitbook)
* Handbook: <https://handbook.openguild.wtf/>


# 📖 Additional Resources

Finding resources to learn about Polkadot development.

* Official resource to learn Substrate: [https://docs.substrate.io/tutorials/](https://docs.substrate.io/tutorials/build-a-blockchain/build-local-blockchain/)
* Follow the Polkadot development roadmap: <https://roadmap.sh/r/polkadot-development-roadmap>
* Learn with *EasyA's Polkadot challenge*: <https://app.openguild.wtf/challenges/easya>
* You can discover resources to learn about *Polkadot* here: <https://openguild.wtf/learn>

<figure><img src="https://2688244615-files.gitbook.io/~/files/v0/b/gitbook-x-prod.appspot.com/o/spaces%2FqpKohKlriBQm0I9cc9k5%2Fuploads%2FAgZ1jVL9MHZEr0Mv7MQl%2FScreenshot%202024-10-29%20at%2009.22.04.png?alt=media&amp;token=769c2896-8bd3-4fce-b825-ba1e8f43e59d" alt=""><figcaption><p>Modules for learning about Polkadot development</p></figcaption></figure>


# 📖 Curriculum

Learn about the structure of this bootcamp's modules and how to use the guidebook effectively for your learning journey.

The guidebook provides you all neccessary knowledge to have adequate skills building on top of the Polkadot technology.&#x20;

Below is the structure of the guidebook:&#x20;

## 📕 Rust Programming Language

<figure><img src="https://2688244615-files.gitbook.io/~/files/v0/b/gitbook-x-prod.appspot.com/o/spaces%2FqpKohKlriBQm0I9cc9k5%2Fuploads%2Fvyrxw6tiWtZ3t5Jq117y%2FOrder%20Banner%20Polkadot%20Open%20Bootcamp.webp?alt=media&amp;token=e9a260b2-db46-4245-b26c-b3b9f7272156" alt=""><figcaption></figcaption></figure>

{% content-ref url="/pages/SUic7ynBvO5aDq2Y987d" %}
[Rust Programming Language](/rust-programming-language/basic-rust)
{% endcontent-ref %}

<table data-full-width="false"><thead><tr><th width="133">Section</th><th data-type="rating" data-max="5">Difficulty</th><th width="611">Name</th><th data-hidden><select><option value="KM4LM5Zph5Fl" label="Polkadot" color="blue"></option><option value="6R525et1jBXM" label="Cumulus" color="blue"></option><option value="Jv09MOyVCfCA" label="XCM" color="blue"></option><option value="B7lhUv0RiksK" label="Substrate" color="blue"></option></select></th></tr></thead><tbody><tr><td>Section 1</td><td>1</td><td><a data-mention href="/rust-programming-language/basic-rust/introduction-to-rust">Introduction to Rust</a></td><td></td></tr><tr><td>Section 2</td><td>2</td><td><a data-mention href="/rust-programming-language/basic-rust/common-programming-concepts">Common Programming Concepts</a></td><td><span data-option="Jv09MOyVCfCA">XCM</span></td></tr><tr><td>Section 3</td><td>2</td><td><a data-mention href="/rust-programming-language/basic-rust/program-life-cycle">Program Life Cycle</a></td><td></td></tr><tr><td>Section 4</td><td>3</td><td><a data-mention href="/rust-programming-language/basic-rust/ownership-and-borrow-checker">Ownership &amp; Borrow Checker</a></td><td></td></tr><tr><td>Section 5</td><td>3</td><td><a data-mention href="/rust-programming-language/basic-rust/common-data-structures">Common Data Structures</a></td><td></td></tr><tr><td>Section 6</td><td>3</td><td><a data-mention href="/rust-programming-language/advanced-rust/generic-types-trait-extension-and-advanced-types">Generic types, Trait extension and Advanced types</a></td><td></td></tr><tr><td>Section 7</td><td>3</td><td><a data-mention href="/rust-programming-language/advanced-rust/lifetime-notation">Lifetime Notation</a></td><td></td></tr><tr><td>Section 8</td><td>4</td><td><a data-mention href="/rust-programming-language/advanced-rust/smart-pointers-and-macros">Smart pointers &amp; Macros</a></td><td></td></tr><tr><td>Section 9</td><td>2</td><td><a data-mention href="/rust-programming-language/advanced-rust/common-design-patterns-in-rust">Common design patterns in Rust</a></td><td></td></tr><tr><td>Section 10</td><td>2</td><td><a data-mention href="/rust-programming-language/advanced-rust/package-management-and-how-to-structure-your-rust-project">Package management &amp; How to structure your Rust project</a></td><td></td></tr><tr><td>Section 11</td><td>2</td><td><a data-mention href="/rust-programming-language/advanced-rust/overview-of-the-rust-ecosystem">Overview of the Rust ecosystem</a></td><td></td></tr></tbody></table>

## 📘 Building a blockchain with Polkadot SDK

<figure><img src="https://2688244615-files.gitbook.io/~/files/v0/b/gitbook-x-prod.appspot.com/o/spaces%2FqpKohKlriBQm0I9cc9k5%2Fuploads%2FFLTzDAol1FeYD3WvhXy5%2FPolkadot%20Open%20Bootcamp%20Banner.webp?alt=media&amp;token=a5c95f3f-db56-4280-a9dc-2e7acb6a338f" alt=""><figcaption></figcaption></figure>

{% content-ref url="/pages/cvrK65RFix5oDjVUjBGp" %}
[Building a blockchain with Polkadot SDK](/building-a-blockchain-with-polkadot-sdk/polkadot)
{% endcontent-ref %}

Learn how to build a blockchain with Polkadot SDK. At the end of this module, you will sucessfully build a functional parachain on Polkadot that allows users to create an onchain community.

<table data-full-width="false"><thead><tr><th width="136">Section</th><th data-type="rating" data-max="5">Difficulty</th><th width="340">Name</th></tr></thead><tbody><tr><td>Prelude</td><td>1</td><td>Introduction to the Developer Bootcamp</td></tr><tr><td>Section 1</td><td>1</td><td><a data-mention href="/building-a-blockchain-with-polkadot-sdk/polkadot-sdk">Polkadot SDK</a></td></tr><tr><td></td><td>2</td><td><a data-mention href="/building-a-blockchain-with-polkadot-sdk/polkadot-sdk/substrate">Substrate</a></td></tr><tr><td></td><td>3</td><td><a data-mention href="/building-a-blockchain-with-polkadot-sdk/polkadot/additional-reads/understanding-the-sharded-network-design-of-polkadot">Understanding the sharded network design of Polkadot</a></td></tr><tr><td>Section 2</td><td>2</td><td><a data-mention href="/building-a-blockchain-with-polkadot-sdk/polkadot-sdk/substrate/create-a-new-blockchain">Create a new blockchain</a></td></tr><tr><td></td><td>2</td><td><a data-mention href="/building-a-blockchain-with-polkadot-sdk/polkadot-sdk/substrate/create-a-new-blockchain/break-down-the-node-architecture">Break down the node architecture</a></td></tr><tr><td>Section 3</td><td>3</td><td>Building a Substrate state machine from scratch</td></tr><tr><td>Section 4</td><td>3</td><td><a data-mention href="/building-a-blockchain-with-polkadot-sdk/polkadot-sdk/substrate/adding-a-custom-logic-to-runtime">Adding a custom logic to runtime</a></td></tr><tr><td></td><td>3</td><td>Substrate storage abstractions &#x26; Common storage data types</td></tr><tr><td></td><td>2</td><td><a data-mention href="/building-a-blockchain-with-polkadot-sdk/polkadot-sdk/substrate/common-runtime-modules">Common runtime modules</a></td></tr><tr><td></td><td>2</td><td><a data-mention href="/building-a-blockchain-with-polkadot-sdk/polkadot-sdk/substrate/adding-a-custom-logic-to-runtime/hooks">Hooks</a></td></tr><tr><td></td><td>2</td><td><a data-mention href="/building-a-blockchain-with-polkadot-sdk/polkadot-sdk/substrate/runtime-api-and-rpc">Runtime API and RPC</a></td></tr><tr><td></td><td>2</td><td><a data-mention href="/building-a-blockchain-with-polkadot-sdk/polkadot-sdk/substrate/adding-a-custom-logic-to-runtime/extensions/signed-extensions">Signed Extensions</a> </td></tr><tr><td></td><td>2</td><td><a data-mention href="/building-a-blockchain-with-polkadot-sdk/polkadot-sdk/substrate/adding-a-custom-logic-to-runtime/weights-and-benchmarking">Weights &amp; Benchmarking</a></td></tr><tr><td>Section 5</td><td>2</td><td>Interacting with the Substrate-based blockchain</td></tr><tr><td></td><td>1</td><td>Mainnet, Testnet and Canary Network</td></tr><tr><td>Section 6</td><td>3</td><td><a data-mention href="/building-a-blockchain-with-polkadot-sdk/polkadot-sdk/substrate/bump-polkadot-sdk-versions">Bump Polkadot SDK versions</a></td></tr><tr><td>Section 7</td><td>4</td><td>Path of Parachain Block breakdown</td></tr><tr><td>Section 8</td><td>3</td><td><a data-mention href="/building-a-blockchain-with-polkadot-sdk/polkadot-sdk/cumulus/introduction-to-cumulus">Introduction to Cumulus</a></td></tr><tr><td>Section 9</td><td>4</td><td>Connect a Parachain to Relaychain network<br><a data-mention href="/building-a-blockchain-with-polkadot-sdk/polkadot-sdk/cumulus/running-a-local-relaychain-network/launch-the-network-and-run-a-collator-node">Launch the network &amp; run a collator node</a><br><a data-mention href="/building-a-blockchain-with-polkadot-sdk/polkadot-sdk/cumulus/running-a-local-relaychain-network">Running a local relaychain network</a></td></tr><tr><td></td><td>3</td><td><a data-mention href="/building-a-blockchain-with-polkadot-sdk/polkadot-sdk/cumulus/agile-coretime">Agile Coretime</a></td></tr><tr><td>Section 10</td><td>4</td><td>Introduction to XCM, Transport Protocols &#x26; XCVM | Open Polkadot Bootcamp</td></tr><tr><td></td><td>4</td><td>XCM Fundamentals with Locations &#x26; Assets</td></tr><tr><td></td><td>4</td><td>Transfers and Transact</td></tr></tbody></table>

## 📒 Smart Contract Development

<figure><img src="https://2688244615-files.gitbook.io/~/files/v0/b/gitbook-x-prod.appspot.com/o/spaces%2FqpKohKlriBQm0I9cc9k5%2Fuploads%2FtgBppvrMlwLgxmzvSuJC%2F2.png%202268x934.webp?alt=media&amp;token=e6b60260-8baf-4107-8100-8f246d3bc06e" alt=""><figcaption></figcaption></figure>

{% content-ref url="/pages/4rOrYEKEMhfve2xy3H8h" %}
[Smart Contract Development](/smart-contract-development/introduction)
{% endcontent-ref %}

<table data-full-width="false"><thead><tr><th width="133">Section</th><th data-type="rating" data-max="5">Difficulty</th><th width="451">Name</th></tr></thead><tbody><tr><td>Section 1</td><td>1</td><td><a data-mention href="/smart-contract-development/introduction/introduction-to-polkavm">Introduction to PolkaVM</a></td></tr><tr><td></td><td>1</td><td><a data-mention href="/smart-contract-development/introduction/getting-started-with-solidity-development">Getting started with Solidity development</a></td></tr><tr><td></td><td>2</td><td><a data-mention href="/smart-contract-development/introduction/solidity-file-structure">Solidity File Structure</a></td></tr><tr><td></td><td>2</td><td><a data-mention href="/smart-contract-development/introduction/contract-structure">Contract Structure</a></td></tr><tr><td>Section 2</td><td>2</td><td><a data-mention href="/smart-contract-development/basic-solidity/value-types">Value types</a></td></tr><tr><td></td><td>2</td><td><a data-mention href="/smart-contract-development/basic-solidity/reference-types">Reference Types</a></td></tr><tr><td></td><td>2</td><td><a data-mention href="/smart-contract-development/basic-solidity/mapping-types">Mapping Types</a></td></tr><tr><td></td><td>3</td><td><a data-mention href="/smart-contract-development/basic-solidity/simple-storage">Simple Storage</a></td></tr><tr><td>Section 3</td><td>2</td><td><a data-mention href="/smart-contract-development/advanced-solidity/units">Units</a></td></tr><tr><td></td><td>2</td><td><a data-mention href="/smart-contract-development/advanced-solidity/global-variables">Global Variables</a></td></tr><tr><td></td><td>2</td><td><a data-mention href="/smart-contract-development/advanced-solidity/expression-and-control-structures">Expression and Control Structures</a></td></tr><tr><td></td><td>3</td><td><a data-mention href="/smart-contract-development/advanced-solidity/advanced-storage">Advanced Storage</a></td></tr><tr><td></td><td>3</td><td><a data-mention href="/smart-contract-development/advanced-solidity/contract-tests">Contract Tests</a></td></tr><tr><td></td><td>3</td><td><a data-mention href="/smart-contract-development/advanced-solidity/contracts">Contracts</a></td></tr></tbody></table>


# Basic Rust


# Introduction to Rust

{% embed url="<https://openguild-labs.github.io/open-rust/syllabus/module/0.1-slides.html#/>" %}

## About Rust programming language

{% embed url="<https://www.rust-lang.org/>" %}
Finding all information about Rust
{% endembed %}

{% embed url="<https://doc.rust-lang.org/book/>" %}
Learn Rust with the Rust Programming Language Book
{% endembed %}

Rust is a systems programming language designed for performance, reliability, and memory safety. It has become popular in the blockchain ecosystem, especially in projects like Polkadot, for its ability to handle high-performance, low-level operations while minimizing risks like memory leaks, race conditions, and other bugs common in lower-level languages. Here’s an overview of Rust and why it’s a powerful choice for blockchain projects:

* **Memory Safety without Garbage Collection**: Rust ensures memory safety without needing a garbage collector, unlike languages like Java or Python. This is critical for blockchain applications, where predictable performance is essential.
* **Concurrency and Parallelism**: Rust’s design makes it easier to write concurrent and parallel programs, which can improve the efficiency and throughput of blockchain nodes and other network components.
* **Performance**: Rust performs similarly to C and C++, making it suitable for use in performance-sensitive environments like blockchain, where nodes often need to process large amounts of data quickly.

## Rust is not the best option for everything.&#x20;

<figure><img src="https://2688244615-files.gitbook.io/~/files/v0/b/gitbook-x-prod.appspot.com/o/spaces%2FqpKohKlriBQm0I9cc9k5%2Fuploads%2FJMNCQWMmMRJBgp95cR0X%2FScreenshot%202024-10-29%20at%2011.12.17.png?alt=media&amp;token=1d89e72d-9d98-4ca5-9b45-d86fa78b759a" alt=""><figcaption></figcaption></figure>

### When not to use Rust?

* Developing user interface (lack of UI components, not flexible as scripting language like Javascript)
* Don’t have a production-ready framework for Web, engine for Game yet.&#x20;
* **Rust is fast, but is it better than React.js or Vue.js?** NO
* **What is the most important part of Game development?** Gaming assets, Game engine (There is no way Rust Bevy Engine is better than Unity or Unreal Engine)

## But with blockchain, it is. Let's learn about the role of Rust in the Polkadot development

Polkadot is built using **Substrate**, a framework developed by Parity Technologies, which is written entirely in Rust. Rust’s features make it an ideal language for Substrate, providing high performance and reliability for Polkadot's complex functionality.

We will learn about Polkadot SDK when we reach the **"Polkadot SDK development"** module. For now, when you visit the Polkadot SDK at <https://github.com/paritytech/polkadot-sdk>, you can obviously see that the SDK is built with 99% in Rust.&#x20;

<figure><img src="https://2688244615-files.gitbook.io/~/files/v0/b/gitbook-x-prod.appspot.com/o/spaces%2FqpKohKlriBQm0I9cc9k5%2Fuploads%2Ft3ghofe0jBBHPgcqg69X%2FScreenshot%202024-10-29%20at%2011.10.35.png?alt=media&amp;token=46b470a9-907c-4dd4-bf75-8c5766f51a85" alt=""><figcaption><p>Reason why Parity Technologies - company behinds Polkadot SDK - choose Rust as the primary language. </p></figcaption></figure>

## Resources

### OpenGuild Open Workshop Slide | Developing Rust Applications

{% embed url="<https://docs.google.com/presentation/d/1s0jqtgt3DYMfYU7k_gaNOLFR9vMo6rrjJULIak2KdMU/edit?usp=sharing>" %}
Developing Rust Applications
{% endembed %}


# 🧑‍💻 Excercises

{% embed url="<https://openguild.wtf/blog/rust/rustlings-01-variables>" %}


# Common Programming Concepts

{% embed url="<https://openguild-labs.github.io/open-rust/syllabus/module/1.1-slides.html#/1>" %}

## Basic concept of the data type in programming

There is a very good chapter in the Rust book for you to learn about Rust data type: <https://doc.rust-lang.org/book/ch03-02-data-types.html>&#x20;

Some key bullet points:&#x20;

* Memory only stores binary data
  * Anything can be represented in binary
* Program determines what the binary represents
* Basic types that are universally useful are provided by the language

<figure><img src="https://2688244615-files.gitbook.io/~/files/v0/b/gitbook-x-prod.appspot.com/o/spaces%2FqpKohKlriBQm0I9cc9k5%2Fuploads%2FpqCciJkdvINH2qODJWhf%2Fimage.png?alt=media&amp;token=83371d01-676c-4e9c-8c61-cd246f662e34" alt=""><figcaption></figcaption></figure>


# 🧑‍💻 Excercises

Rustlings from Chapter 2 to Chapter 6: <https://openguild.wtf/blog/rust/rustlings-summary>

<figure><img src="https://2688244615-files.gitbook.io/~/files/v0/b/gitbook-x-prod.appspot.com/o/spaces%2FqpKohKlriBQm0I9cc9k5%2Fuploads%2FUUv0jazGEnmPpQhWmImC%2FScreenshot%202024-10-29%20at%2013.17.15.png?alt=media&amp;token=44e337a2-19fa-4c3b-910e-975b2c204a54" alt=""><figcaption></figcaption></figure>


# Program Life Cycle

{% embed url="<https://openguild-labs.github.io/open-rust/syllabus/module/1.2-slides.html#/>" %}

The lifecycle of a Rust program involves several stages from writing the code to running the executable. Here’s a breakdown of each phase:

Before we go to the detailed steps, we must have a full view of components needed for a Rust program:&#x20;

### Preparation

* Make sure you have all installation ready: <https://doc.rust-lang.org/book/ch01-01-installation.html>
* After that, you need to install package manager: <https://doc.rust-lang.org/cargo/>
* And then the Rust compiler: <https://doc.rust-lang.org/rustc/>

### Writing the code

1. *To start a new Rust program, run a command*

The main entry point file generated by this command is `main.rs`

```sh
cargo new <app_name>
```

2. *Or if you build a library, you run a command*

**Modules and Crates**: Code is organized into modules and crates (libraries or binaries). Rust has an ecosystem of reusable libraries (crates) that can be imported to extend functionality.

The main entry point file generated by this command is `lib.rs`

```sh
cargo new --lib <app_name>
```

3. *Package management file*

`Cargo.toml` and `Cargo.lock` is the two files that manage the dependencies of the Rust program. To understand how to use these files correctly, follow this guide: <https://doc.rust-lang.org/cargo/guide/cargo-toml-vs-cargo-lock.html>

3. *Understand basic syntax*

Here's a quick overview of Rust's basic syntax with examples to help you get started:

* **Variables and Mutability:** Variables are immutable by default, meaning you can't change their values unless explicitly marked with `mut`.

```rust
fn main() {
    let x = 5;        // Immutable variable
    let mut y = 10;   // Mutable variable
    y += 5;
    println!("x: {}, y: {}", x, y);
}
```

* **Data types:** We already learnt about data types in the last lesson. Please revise if you forget.&#x20;
* **Functions:** Functions are defined with the `fn` keyword, and parameters need types.

```rust
fn main() {
    greet("Alice");
    let result = add(5, 3);
    println!("Sum: {}", result);
}

fn greet(name: &str) {
    println!("Hello, {}!", name);
}

fn add(a: i32, b: i32) -> i32 {
    a + b   // No semicolon means this is the return value
}
```

* **Conditionals:** `if`, `else if`, and `else` for conditional logic.

```rust
fn main() {
    let number = 7;
    if number < 5 {
        println!("Less than 5");
    } else if number == 5 {
        println!("Equal to 5");
    } else {
        println!("Greater than 5");
    }
}
```

* **Loops:** Rust has several looping constructs: `loop`, `while`, and `for`.

```rust
fn main() {
    let mut count = 0;

    // Infinite loop
    loop {
        if count >= 3 {
            break;
        }
        println!("Count: {}", count);
        count += 1;
    }

    // While loop
    while count < 5 {
        println!("Count: {}", count);
        count += 1;
    }

    // For loop
    for i in 0..5 {
        println!("i: {}", i);
    }
}
```

Those are basic syntax that you must know before diving into harder concetps. &#x20;

### Compilation

To compile and run the Rust program, run the command:

```sh
cargo run
```

* Rust’s `rustc` compiler translates the source code into machine code in a single pass, focusing on safety and performance.
* The compilation process includes:
  * **Parsing**: Rust parses the code to check for syntax correctness.
  * **Analysis and Borrow Checker**: Rust’s borrow checker enforces memory safety rules by validating ownership, borrowing, and lifetime rules, ensuring memory safety without a garbage collector.
  * **Code Generation and Optimization**: Rust generates optimized machine code, removing unused variables, inlining functions, and applying other optimizations.
* **Result**: Rust produces an intermediate binary in the form of an object file, then links these files to produce an executable file.

## Exercises

{% embed url="<https://openguild.wtf/blog/rust/rustlings-02-functions>" %}


# 🧑‍💻 Excercises

Rustlings from Chapter 7 to Chapter 12: <https://openguild.wtf/blog/rust/rustlings-summary>

<figure><img src="https://2688244615-files.gitbook.io/~/files/v0/b/gitbook-x-prod.appspot.com/o/spaces%2FqpKohKlriBQm0I9cc9k5%2Fuploads%2FSXkJnIVfj2wrcxxKe0G5%2FScreenshot%202024-10-29%20at%2013.18.26.png?alt=media&amp;token=ec04fb77-9208-4a7e-9ecf-ac7eba1813fc" alt=""><figcaption></figcaption></figure>


# Ownership & Borrow Checker

{% embed url="<https://openguild-labs.github.io/open-rust/syllabus/module/1.3-slides.html#/>" %}

**Ownership in Rust** could be a hard topic to understand and apply it in real code. Hence, let’s imagine Rust ownership using toys!

Imagine you have a toy car. In Rust, only one person can *own* that toy car at a time. This means only one person can hold it, play with it, and take care of it.

1. **Ownership Rule**: If you give your toy car to your friend, now *they* are the owner, not you. You can't play with it anymore unless they give it back. This way, there's only ever one owner at a time—this prevents anyone from accidentally breaking it by both trying to use it at once.
2. **Borrowing Rule**: Now, let's say you want to let your friend *borrow* your toy for a while without giving it to them completely. You can say, "Here, you can play with my toy, but I still own it." In Rust, this is called "borrowing." Your friend can play with the toy, but they know it still belongs to you and has to give it back soon. This keeps the toy safe because it always has one true owner.
3. **No Double-Owners Rule**: Lastly, only one person can borrow the toy at a time to make sure it doesn’t get mixed up or broken. But if everyone just wants to *look* at the toy without touching it, several friends can peek at it at the same time. In Rust, these are called "immutable references."

So, Rust's ownership is like toy rules: only one owner, borrowing is temporary, and no fighting over the toy!

<div align="center"><figure><img src="https://2688244615-files.gitbook.io/~/files/v0/b/gitbook-x-prod.appspot.com/o/spaces%2FqpKohKlriBQm0I9cc9k5%2Fuploads%2FiSSkEeWV6tskrO09s45B%2Fimage.png?alt=media&amp;token=0d34515a-b82b-4ced-9151-2f11d065943c" alt="" width="563"><figcaption><p>Above image gives you a visualization of how the pointer is <br>moved and referenced which is a part of ownership. </p></figcaption></figure></div>

### Let's be more specific

#### 1. **Moving Ownership**

Imagine you’re holding your toy car, and you decide to give it to your friend Sam. When you hand the toy over, you’re not just sharing—you’re transferring full ownership to Sam. Now, *only Sam* can play with that toy, and you can’t touch it anymore. In Rust, we call this “moving” ownership. It’s like saying, “Hey, Sam, this toy car is yours now. I’ll get my own toy.”

```rust
fn main() {
    let toy = String::from("Toy car"); // `toy` owns the string

    let new_owner = toy; // `toy` is moved to `new_owner`

    // println!("{}", toy); // Error! `toy` no longer owns the value
    println!("{}", new_owner); // This works since `new_owner` is the current owner
}
```

#### 2. **Borrowing Mutably (or with Permission to Change)**

Now, let’s say you’ve kept your toy car but let your friend Jamie borrow it. Jamie asks if they can change it by adding cool stickers. You decide, "Okay, but remember, *I* still own it!" In Rust, this is a *mutable borrow*. Jamie can make changes, but only because you allowed it temporarily. Once Jamie is done, they give it back, and you have your newly decorated toy car.

In Rust, you can only let *one person at a time* make changes with a mutable borrow. This ensures that there’s no confusion or conflict over who is modifying the toy.

```rust
fn main() {
    let mut toy = String::from("Toy car");

    // `toy` is borrowed mutably by `decorate`
    decorate(&mut toy); 

    println!("{}", toy); // Prints: "Toy car with stickers"
}

fn decorate(toy: &mut String) {
    toy.push_str(" with stickers"); // Modify the borrowed `toy`
}
```

#### 3. **Borrowing Immutably (Just to Look)**

Now, let’s say a few of your friends just want to *look at* the toy, not play with it or add stickers. They ask, and you say, “Sure, you can all look at it, but don’t touch or change anything!” This is called an *immutable borrow*. You can let multiple friends look at it at once because they’re not changing anything. In Rust, this allows for several immutable borrows at the same time.

```rust
fn main() {
    let toy = String::from("Toy car");

    let look1 = &toy; // Immutable borrow
    let look2 = &toy; // Another immutable borrow

    println!("Look 1: {}", look1); // Prints: "Look 1: Toy car"
    println!("Look 2: {}", look2); // Prints: "Look 2: Toy car"

    // `toy.push_str(" new")`; // Error! Cannot modify `toy` while it is immutably borrowed
}
```

#### 4. **When the Toy Goes Out of Scope (Cleaning Up)**

Finally, imagine it’s the end of the day, and you have to go home. You take your toy car with you, but if you forget it at your friend’s house, their parent might pick it up and put it away. In Rust, this is like when a value goes *out of scope*. When you’re done with a variable (or toy), Rust automatically “cleans it up” for you so there’s no leftover mess.

In programming terms, this cleanup is called *dropping*, and Rust does it automatically when the toy (or variable) is no longer needed.

```rust
fn main() {
    let toy = String::from("Toy car"); // `toy` owns the string
    {
        let _borrowed_toy = &toy; // `_borrowed_toy` borrows `toy`
        println!("Inside scope: {}", _borrowed_toy); // Works within this inner scope
    } // `_borrowed_toy` goes out of scope here

    println!("Outside scope: {}", toy); // Still accessible since `toy` is still in scope
} // `toy` goes out of scope and is automatically cleaned up
```


# Common Data Structures

{% embed url="<https://openguild-labs.github.io/open-rust/syllabus/module/1.4-slides.html>" %}

## Enumeration

{% embed url="<https://doc.rust-lang.org/book/ch06-01-defining-an-enum.html>" %}
Learn about Enum in the Rust programming language book
{% endembed %}

<figure><img src="https://2688244615-files.gitbook.io/~/files/v0/b/gitbook-x-prod.appspot.com/o/spaces%2FqpKohKlriBQm0I9cc9k5%2Fuploads%2FafzfGw5OHxVtweCOOZc2%2FScreenshot%202024-10-29%20at%2013.34.09.png?alt=media&amp;token=252aa2d5-15d3-4d60-9374-967ddf750d4b" alt=""><figcaption><p>Bullet points of the enumeration</p></figcaption></figure>

An enumeration, or enum, is a data type that allows a variable to take on one of several possible values (or states). Each of these possibilities is called a "variant." For example, in Rust, an enum can represent different states of a traffic light with variants such as `Red`, `Yellow`, and `Green`.

```rust
enum Direction {
    Up,
    Down,
    Left,
    Right,
}

fn which_way(go: Direction) -> &'static str {
    match go {
        Direction::Up => "up",
        Direction::Down => "down",
        Direction::Left => "left",
        Direction::Right => "right",
    }
}
```

## Structure

<figure><img src="https://2688244615-files.gitbook.io/~/files/v0/b/gitbook-x-prod.appspot.com/o/spaces%2FqpKohKlriBQm0I9cc9k5%2Fuploads%2FzSWnywDp19aSjqPItUh4%2FScreenshot%202024-10-29%20at%2013.37.02.png?alt=media&amp;token=4f0b3228-d0f2-4174-91eb-2e03f6a5badc" alt=""><figcaption></figcaption></figure>

```rust
struct ShippingBox {
    depth: i32,
    width: i32,
    height: i32,
}

fn main() {
    let my_box = ShippingBox {
        depth: 3,
        width: 2,
        height: 5,
    };

    let tall = my_box.height;
    println!("the box is {:?} units tall", tall);
}
```


# Advanced Rust


# Generic types, Trait extension and Advanced types

Slide: <https://openguild-labs.github.io/open-rust/syllabus/module/2.1-slides.html>


# Lifetime Notation

Slide: <https://openguild-labs.github.io/open-rust/syllabus/module/2.2-slides.html>


# Smart pointers & Macros

Slide: <https://openguild-labs.github.io/open-rust/syllabus/module/2.3-slides.html>


# Common design patterns in Rust

Slide: <https://openguild-labs.github.io/open-rust/syllabus/module/2.4-slides.html>


# Package management & How to structure your Rust project

Slide: <https://openguild-labs.github.io/open-rust/syllabus/module/2.5-slides.html>


# Overview of the Rust ecosystem

Slide: <https://openguild-labs.github.io/open-rust/syllabus/module/2.6-slides.html>


# Polkadot


# Additional Reads


# Why do you want to build a blockchain on Polkadot?

<figure><img src="https://2688244615-files.gitbook.io/~/files/v0/b/gitbook-x-prod.appspot.com/o/spaces%2FqpKohKlriBQm0I9cc9k5%2Fuploads%2FgXLiT3uSeskSXckstieF%2FScreenshot%202024-10-29%20at%2014.00.18.png?alt=media&amp;token=5318e14e-86fa-4628-a6ef-cf2e21fbb4a1" alt=""><figcaption><p>If you search on Google: "Is building a blockchain hard?"</p></figcaption></figure>

Building a blockchain is not an easy process. You can take a 4 months bootcamp to learn how to build a fullstack web application. However, with blockchain engineering, it requires strong foundational knowledge in computer science, networking and cryptography to build something that is usable by the industry.&#x20;

<figure><img src="https://2688244615-files.gitbook.io/~/files/v0/b/gitbook-x-prod.appspot.com/o/spaces%2FqpKohKlriBQm0I9cc9k5%2Fuploads%2FP71JVlFQJk2SWpBAiOir%2FScreenshot%202024-10-29%20at%2014.03.24.png?alt=media&amp;token=a3c902e8-9e0e-49bc-8c03-abceac1a2eb8" alt=""><figcaption><p>There are a lot of domain specific knowledge to build a blockchain <br>that is beneficial to the industry</p></figcaption></figure>

**Polkadot SDK** provides a framework for you to use to build a blockchain easily without caring much about other primitvie knowledge and low-level engineering like cryptography, virtual machine, database...and only need to focus on building what matters to the logic of the blockchain. This is so-called application specific blockchain.&#x20;

<figure><img src="https://2688244615-files.gitbook.io/~/files/v0/b/gitbook-x-prod.appspot.com/o/spaces%2FqpKohKlriBQm0I9cc9k5%2Fuploads%2FfGWx9cGpHiAagFYLqEH2%2Fimage.png?alt=media&amp;token=7ade6258-6f68-40ab-a0f6-f25b7ea82d7a" alt=""><figcaption><p>Substrate Client is a game console while the logic built on top of it is <br>a game catridge that only need to plug and play</p></figcaption></figure>

And there is another anology I really like is the LEGO bridge analogy:&#x20;

<figure><img src="https://2688244615-files.gitbook.io/~/files/v0/b/gitbook-x-prod.appspot.com/o/spaces%2FqpKohKlriBQm0I9cc9k5%2Fuploads%2F4d14NtiMqQkGya2AfJJw%2FScreenshot%202024-10-29%20at%2014.10.16.png?alt=media&amp;token=b877ea37-dfe5-4155-adb5-b4c69f456ea7" alt=""><figcaption><p>Building a blockchain with Substrate is like playing LEGO<br>What you want to build is a complete LEGO house aka a blockchain<br>And what you have is single solid LEGO bridge aka a Substrate framework</p></figcaption></figure>

<figure><img src="https://2688244615-files.gitbook.io/~/files/v0/b/gitbook-x-prod.appspot.com/o/spaces%2FqpKohKlriBQm0I9cc9k5%2Fuploads%2F0y8NsJgEbjUdg4SB6EMY%2FScreenshot%202024-10-29%20at%2014.10.40.png?alt=media&amp;token=021c7cb6-5c47-4f0f-9fec-47f20b48b8de" alt=""><figcaption><p>You just simply add these small blue LEGO bridge on top of your Substrate LEGO bridge.<br>And BAMP! You have a complete blockchain</p></figcaption></figure>

## Benefits of building a blockchain on Polkadot

{% embed url="<https://docs.google.com/presentation/d/1OMcIuihsdrBaMGlQvGkYPTsUDfA1VQ0oXvAG5VfdPmQ/mobilepresent?slide=id.g2d41f1c3107_1_240>" %}

<figure><img src="https://2688244615-files.gitbook.io/~/files/v0/b/gitbook-x-prod.appspot.com/o/spaces%2FqpKohKlriBQm0I9cc9k5%2Fuploads%2FslF2t1ZkeI9kZTe36Xrn%2FScreenshot%202024-10-29%20at%2014.14.56.png?alt=media&amp;token=8d242274-9476-4949-a532-bd8cf9d98fd0" alt=""><figcaption></figcaption></figure>

<figure><img src="https://2688244615-files.gitbook.io/~/files/v0/b/gitbook-x-prod.appspot.com/o/spaces%2FqpKohKlriBQm0I9cc9k5%2Fuploads%2FO7aQxA66PsVyvoewDBpN%2FScreenshot%202024-10-29%20at%2014.15.56.png?alt=media&amp;token=a2422c42-eb02-41ea-b45b-885b131f4fa5" alt=""><figcaption></figcaption></figure>

<figure><img src="https://2688244615-files.gitbook.io/~/files/v0/b/gitbook-x-prod.appspot.com/o/spaces%2FqpKohKlriBQm0I9cc9k5%2Fuploads%2FiWHjtOhQAC6t3Ov6c6YO%2Fimage.png?alt=media&amp;token=b9d477f1-b8f1-45b5-acce-e1985dc2e7c1" alt=""><figcaption></figcaption></figure>


# Understanding the sharded network design of Polkadot

<figure><img src="https://2688244615-files.gitbook.io/~/files/v0/b/gitbook-x-prod.appspot.com/o/spaces%2FqpKohKlriBQm0I9cc9k5%2Fuploads%2FXPAKU6PVqeF4IpTfz0fA%2Fimage.png?alt=media&amp;token=c2747924-1528-455e-aad2-4c2d30ca852e" alt=""><figcaption><p>Evolution of blockchain system</p></figcaption></figure>

* Original post: <https://blog.chungquantin.com/blog/break-down-the-sharded-network-design-of-polkadot>

Sharding is scalability concept in computer science. Most of the time, we will be more familiar with Database Sharding. Prior context before the technical breakdown, scaling up the database vertically will face a lot of limitations, hence, we need an approach that can scale out horizontally.

<figure><img src="https://2688244615-files.gitbook.io/~/files/v0/b/gitbook-x-prod.appspot.com/o/spaces%2FqpKohKlriBQm0I9cc9k5%2Fuploads%2F27XYdgpv8IESD6aDVjgG%2Fimage.png?alt=media&amp;token=8af7dd2a-a71d-4480-a883-0054bc23018e" alt="" width="375"><figcaption><p>Visualization to understand how the parachain <br>connects with the relaychain</p></figcaption></figure>

By that way, database sharding is a solution we are looking for. Instead of trying to fit a large amount of data into one single database, we try to "shard" (or "chunk") it into smaller chunks of data and share those with other database server.

In Polkadot, the concept of sharding is a bit different because it is applied to the network layer not the database layer. Network sharding in Polkadot in a form of an independent yet interoperable blockchain network called Parachains, simply sub-blockchain but can execute in parallel.

We will discover more about Parachain architecture and how parallel execution happens in the later section. But first, let's learn a bit about the existing problems of the yin-yang design of shared network, a fully synchronous network.

### Problem with a High-Performance Fully Synchronous Network <a href="#problem-with-a-high-performance-fully-synchronous-network" id="problem-with-a-high-performance-fully-synchronous-network"></a>

Even though I worked on a synchronous network before, I mainly described their limitation as a centralized network instead of synchronous. I learnt about the term from the recent "JAM Gray Paper" from Gavin, co-founder of Ethereum and Polkadot.

> Reference: 2.4. High-Performance Fully Synchronous Networks - JAM Gray Paper, Gavin Wood

Even though decentralization is not a top primary goal of the synchronous network, the coherency is much better than the sharded network.

For the definition, coherency in a blockchain network refers to the consistency and agreement of data across the DTL (distributed ledger technology). Achieving coherency ensures that all nodes in the network have a synchronized and accurate copy of the blockchain, preventing discrepancies and conflicts.

Blockchain Solana which is a top candidate for the Fully Synchronous Network, has a high requirement for the validator node to reach the goal for high performance. Hence, the number of validator nodes is restricted leading to a more seamless data synchronization across nodes.

However, there is a trade-off in terms of the long-term scalability when high spec requirement (🥵512GB RAM) for the Solana validator node is needed for the data of the network to be stored in each node.

This design is extremely hard for a new validator node to join the network and they must accept to sacrifice the decentralization for the better throughput.

### What is a PARACHAIN? <a href="#what-is-a-parachain" id="what-is-a-parachain"></a>

Parachain is simply a sub-blockchain in the Polkadot network. Every Parachain connects to a Relaychain to use the full features that the protocol brings to it. Parachain has its own set of nodes to handle the block production and collation. Because Parachain is a sub-blockchain, it has all the functionalities and the architecture of a blockchain.

> 🔖 Reference: Take a deeper look into the collation protocol here: <https://paritytech.github.io/polkadot-sdk/book/node/collators/collator-protocol.html>

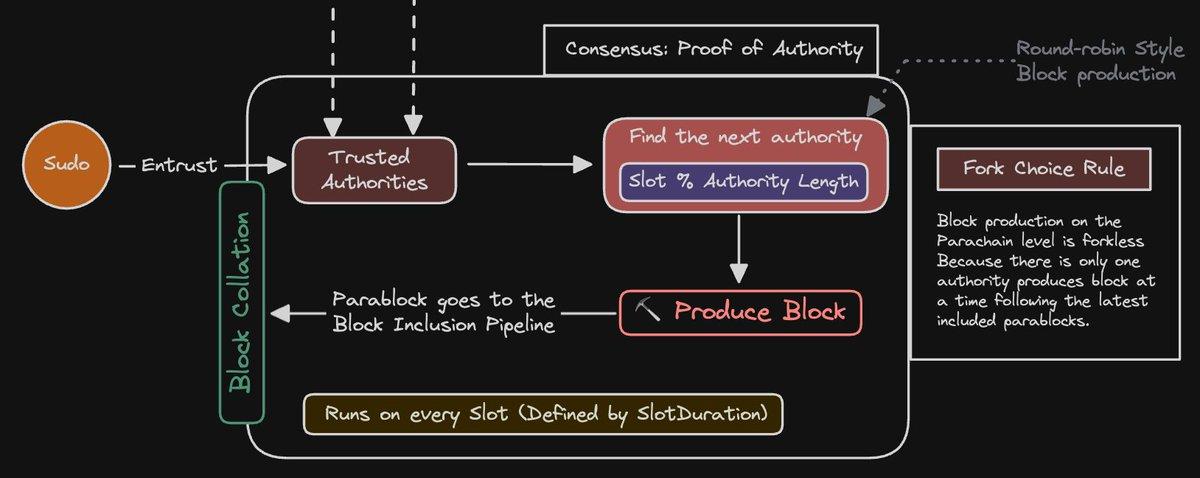
Parachain uses AURA (Round-robin style) as a block production mechanism and PoA (Proof of Authority) as a consensus mechanism. Deep dive into its block production flow, a set of trusted authorities will be defined on the initialized of the Parachain through Substrate chain specification or added by the super user (Sudo).

<figure><img src="https://blog.chungquantin.com/_next/image?url=%2Fstatic%2Fimages%2Fbreak-down-the-sharded-network-design-of-polkadot__image_2.jpeg&#x26;w=3840&#x26;q=75" alt=""><figcaption><p>Visualization of the block production mechanism of a parachain</p></figcaption></figure>

Every round, an authority from the trusted authority set will be selected in a Round-Robin style (<https://en.wikipedia.org/wiki/Round-robin_scheduling>) similar to the way process is scheduled in OS, and starts producing a new block. After this stage, instead of being finalized and added to the chain state of the Parachain, the block is collated to the Parachain Block Inclusion Pipeline - A process of adding a new parachain block to the shared state of a Relaychain.

> 🔖 Reference: Learn how Polkadot handles block production and block finality in hybrid consensus: <https://x.com/chungquantin/status/1808726232827318778>

### Execution Core Assignment <a href="#execution-core-assignment" id="execution-core-assignment"></a>

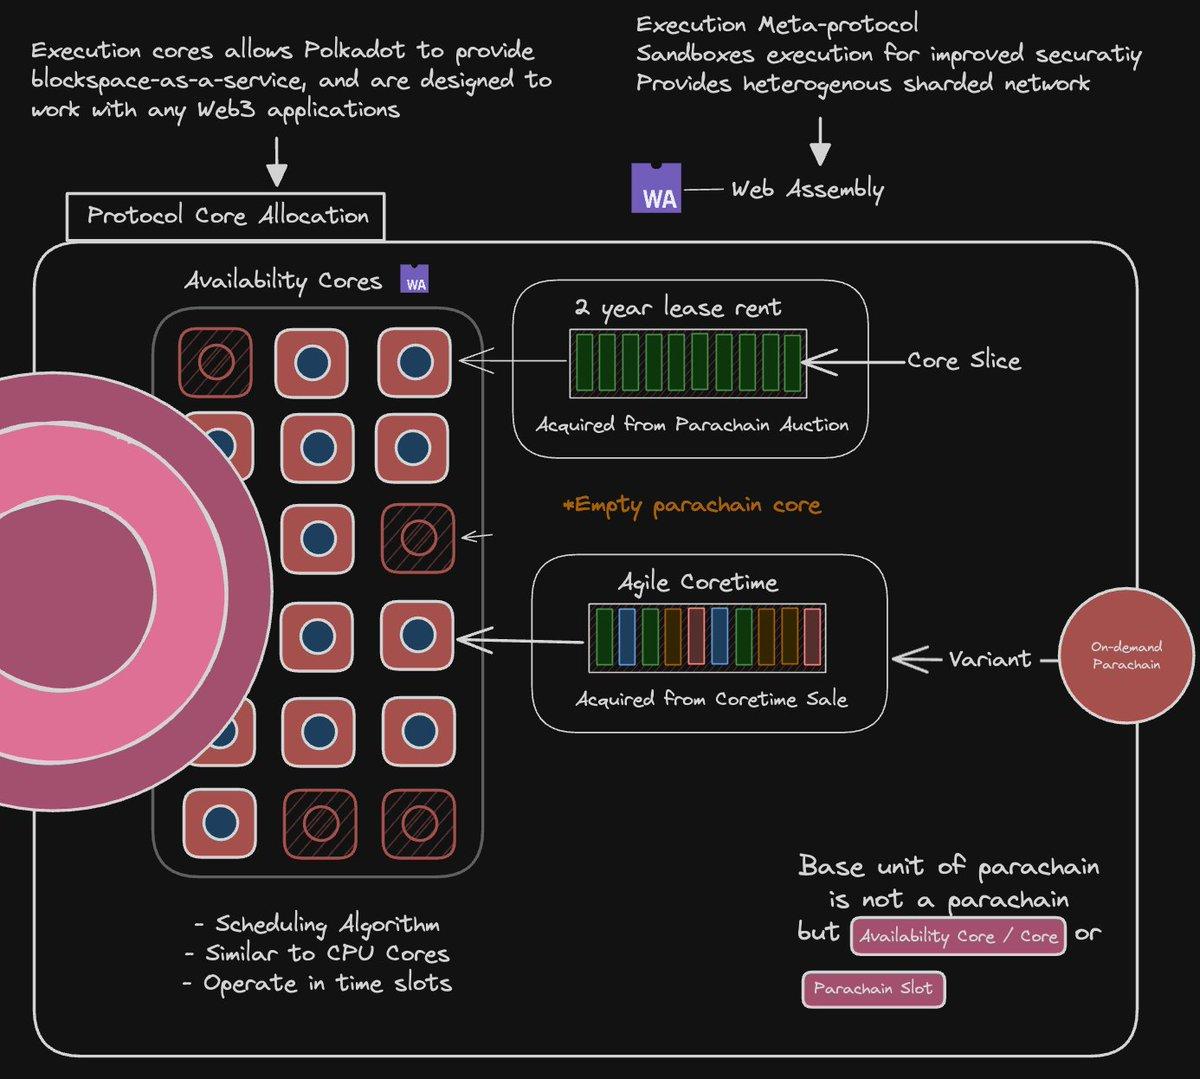
Aside from network sharding, Polkadot also introduces a concept of execution sharding. The underlying layer of the whole protocol is called a Polkadot Parachain Host, which provides functions used for building the parachain protocol. A compiled Parachain node is simply a WASM blob, these blobs are assigned to the availability cores.

<figure><img src="https://blog.chungquantin.com/_next/image?url=%2Fstatic%2Fimages%2Fbreak-down-the-sharded-network-design-of-polkadot__image_3.jpeg&#x26;w=3840&#x26;q=75" alt=""><figcaption><p>Execution Core Assignment on Polkadot Host</p></figcaption></figure>

In Polkadot 1.0, one core can only be occupied by one Parachain in a 2-year lease rent. The decision of who occupies the core for the next period is processed through a candle auction called Parachain Auction. However, due to several limitations in term of flexibility, core allocation has been changed to be more flexible in the 2.0 version of the Polkadot protocol.

> 🔖 Reference: Availability Core <https://paritytech.github.io/polkadot-sdk/book/runtime-api/availability-cores.html>


# Development on Polkadot

<figure><img src="https://2688244615-files.gitbook.io/~/files/v0/b/gitbook-x-prod.appspot.com/o/spaces%2FqpKohKlriBQm0I9cc9k5%2Fuploads%2FUPnzDjuo1MAXw9LFlfxs%2Fimage.png?alt=media&amp;token=0ce49db9-b171-4d02-aa78-c3a72aa9c79b" alt=""><figcaption><p>Development Ecosystem Overview</p></figcaption></figure>


# Polkadot SDK

Building a blockchain on Polkadot with a Polkadot Development Kit (PDK)


# Substrate


# Create a new blockchain

Learn how to create a new blockchain using Polkadot SDK - Substrate

### Basic architecture of a blockchain network

<figure><img src="https://2688244615-files.gitbook.io/~/files/v0/b/gitbook-x-prod.appspot.com/o/spaces%2FqpKohKlriBQm0I9cc9k5%2Fuploads%2FsmdeST3b8IFc0dEtTtik%2FScreenshot%202024-11-03%20at%2021.58.06.png?alt=media&amp;token=be0fef19-ffbe-4cc3-895e-049cad72e6cf" alt=""><figcaption><p>Basic architecture of a blockchain network</p></figcaption></figure>

### What is a Polkadot SDK?

Learn more about Polkadot SDK: <https://polkadot.com/platform/sdk>

<figure><img src="https://2688244615-files.gitbook.io/~/files/v0/b/gitbook-x-prod.appspot.com/o/spaces%2FqpKohKlriBQm0I9cc9k5%2Fuploads%2FN4otc9jqbFpNGWCUVzA5%2FScreenshot%202024-11-03%20at%2021.45.14.png?alt=media&amp;token=f7365847-c4aa-4d99-9f33-1fe42a8279f8" alt=""><figcaption><p>Key Features of Polkadot SDK</p></figcaption></figure>

### What is a Substrate framework?&#x20;

Polkadot is a layer-0 protocol and multichain network laying the foundation for the future of Web3. Substrate is the primary blockchain SDK used by developers to create the parachains that make up the Polkadot network.

* Learn more about Substrate: <https://substrate.io/vision/substrate-and-polkadot/>

{% content-ref url="/pages/P10a32KHIwyvgrkjPKj5" %}
[Understanding the architecture](/building-a-blockchain-with-polkadot-sdk/polkadot-sdk/substrate/create-a-new-blockchain/understanding-the-architecture)
{% endcontent-ref %}

### Create a new blockchain with Pop CLI

{% content-ref url="/pages/UM7xZLRvWn1JmE7cAsOh" %}
[Introducing to Pop CLI tool](/building-a-blockchain-with-polkadot-sdk/polkadot-sdk/substrate/create-a-new-blockchain/introducing-to-pop-cli-tool)
{% endcontent-ref %}

### Running a solochain

{% embed url="<https://docs.substrate.io/tutorials/build-a-blockchain/build-local-blockchain/>" %}

### Running a local relaychain / parachain network

Building a parachain on Polkadot Wiki: <https://wiki.polkadot.network/docs/build-guide#building-parachains>

<figure><img src="https://2688244615-files.gitbook.io/~/files/v0/b/gitbook-x-prod.appspot.com/o/spaces%2FqpKohKlriBQm0I9cc9k5%2Fuploads%2FNayoDnmYZGF08DtWNXHL%2Fimage.png?alt=media&amp;token=a448b8f0-4f6f-4911-b766-5cd50bb42b2a" alt=""><figcaption><p>Components of a Polkadot network with Relay Chain &#x26; Parachains</p></figcaption></figure>


# Understanding the architecture

<figure><img src="https://2688244615-files.gitbook.io/~/files/v0/b/gitbook-x-prod.appspot.com/o/spaces%2FqpKohKlriBQm0I9cc9k5%2Fuploads%2FzZnvxv22WKQcoDiHDsbl%2FScreenshot%202024-11-03%20at%2021.38.39.png?alt=media&amp;token=ef857ad5-2304-4bf3-82ab-be93518c3be8" alt=""><figcaption><p>Overall architecture of a Substrate blockchain</p></figcaption></figure>

We will use the Partiy minimal template for a Substrate blockchain to guide you through the concepts: [https://github.com/paritytech/polkadot-sdk/tree/master/templates/minimal/](https://github.com/paritytech/polkadot-sdk/tree/master/templates/minimal/pallets)

Alternative repository that you can consider reference from: <https://github.com/paritytech/polkadot-sdk-solochain-template>

1. **Runtime**&#x20;

In Substrate, the terms "runtime" and "state transition function" are analogous. Both terms refer to the core logic of the blockchain that is responsible for validating blocks and executing the state changes they define. The Substrate project in this repository uses [FRAME](https://docs.substrate.io/learn/runtime-development/#frame) to construct a blockchain runtime. FRAME allows runtime developers to declare domain-specific logic in modules called "pallets". At the heart of FRAME is a helpful [macro language](https://docs.substrate.io/reference/frame-macros/) that makes it easy to create pallets and flexibly compose them to create blockchains that can address [a variety of needs](https://substrate.io/ecosystem/projects/).

Review the [FRAME runtime implementation](https://github.com/paritytech/polkadot-sdk-solochain-template/blob/master/runtime/src/lib.rs) included in this template and note the following:

* This file configures several pallets to include in the runtime. Each pallet configuration is defined by a code block that begins with `impl $PALLET_NAME::Config for Runtime`.
* The pallets are composed into a single runtime by way of the [`construct_runtime!`](https://paritytech.github.io/substrate/master/frame_support/macro.construct_runtime.html) macro, which is part of the [core FRAME pallet library](https://docs.substrate.io/reference/frame-pallets/#system-pallets).

2. **Node**&#x20;

{% content-ref url="/pages/Ccn8Z3WhlT0GIhx04EXm" %}
[Break down the node architecture](/building-a-blockchain-with-polkadot-sdk/polkadot-sdk/substrate/create-a-new-blockchain/break-down-the-node-architecture)
{% endcontent-ref %}

2. **Pallets**

<figure><img src="https://2688244615-files.gitbook.io/~/files/v0/b/gitbook-x-prod.appspot.com/o/spaces%2FqpKohKlriBQm0I9cc9k5%2Fuploads%2FAeRDm2IOB5yx75nejxec%2FScreenshot%202024-11-04%20at%2023.07.32.png?alt=media&amp;token=7a34e2d0-53cc-42c7-9ef4-8986addef962" alt=""><figcaption><p>Adding a new logic to the new blockchain is like playing with LEGO blocks</p></figcaption></figure>

The runtime in this project is constructed using many FRAME pallets that ship with [the Substrate repository](https://github.com/paritytech/polkadot-sdk/tree/master/substrate/frame) and a template pallet that is [defined in the `pallets`](https://github.com/paritytech/polkadot-sdk-solochain-template/blob/master/pallets/template/src/lib.rs) directory.

A FRAME pallet is comprised of a number of blockchain primitives, including:

* Storage: FRAME defines a rich set of powerful [storage abstractions](https://docs.substrate.io/build/runtime-storage/) that makes it easy to use Substrate's efficient key-value database to manage the evolving state of a blockchain.
* Dispatchables: FRAME pallets define special types of functions that can be invoked (dispatched) from outside of the runtime in order to update its state.
* Events: Substrate uses [events](https://docs.substrate.io/build/events-and-errors/) to notify users of significant state changes.
* Errors: When a dispatchable fails, it returns an error.

Each pallet has its own `Config` trait which serves as a configuration interface to generically define the types and parameters it depends on.

### Code walkthrough

* Node: <https://github.com/paritytech/polkadot-sdk/tree/master/templates/minimal/node>
* Pallet registry: <https://github.com/paritytech/polkadot-sdk/blob/fa52407856c11ee138a32f2ba744f774fac984d5/templates/minimal/runtime/src/lib.rs#L127C1-L128C14>
* Pallet configuration: <https://github.com/paritytech/polkadot-sdk/blob/master/templates/minimal/runtime/src/lib.rs#L184>
* Specifying Runtime version: <https://github.com/paritytech/polkadot-sdk/blob/master/templates/minimal/runtime/src/lib.rs#L88>
* Transaction signed extension: <https://github.com/paritytech/polkadot-sdk/blob/master/templates/minimal/runtime/src/lib.rs#L106>


# Break down the node architecture

<figure><img src="https://2688244615-files.gitbook.io/~/files/v0/b/gitbook-x-prod.appspot.com/o/spaces%2FqpKohKlriBQm0I9cc9k5%2Fuploads%2F3hcCINnvWc5paeSDoQYv%2Fimage.png?alt=media&amp;token=89df62b0-5192-4e5e-9f14-3d82b4ab18f7" alt=""><figcaption><p>Anatomy of a Substrate Node</p></figcaption></figure>

A blockchain node is an application that allows users to participate in a blockchain network. Substrate-based blockchain nodes expose a number of capabilities:

* **Networking**: Substrate nodes use the [`libp2p`](https://libp2p.io/) networking stack to allow the nodes in the network to communicate with one another.
* **Consensus**: Blockchains must have a way to come to [consensus](https://docs.substrate.io/fundamentals/consensus/) on the state of the network. Substrate makes it possible to supply custom consensus engines and also ships with several consensus mechanisms that have been built on top of [Web3 Foundation research](https://research.web3.foundation/Polkadot/protocols/NPoS).
* **RPC Server**: A remote procedure call (RPC) server is used to interact with Substrate nodes.

There are several files in the `node` directory. Take special note of the following:

* [`chain_spec.rs`](https://github.com/paritytech/polkadot-sdk-solochain-template/blob/master/node/src/chain_spec.rs): A [chain specification](https://docs.substrate.io/build/chain-spec/) is a source code file that defines a Substrate chain's initial (genesis) state. Chain specifications are useful for development and testing, and critical when architecting the launch of a production chain. Take note of the `development_config` and `testnet_genesis` functions. These functions are used to define the genesis state for the local development chain configuration. These functions identify some [well-known accounts](https://docs.substrate.io/reference/command-line-tools/subkey/) and use them to configure the blockchain's initial state.
* [`service.rs`](https://github.com/paritytech/polkadot-sdk-solochain-template/blob/master/node/src/service.rs): This file defines the node implementation. Take note of the libraries that this file imports and the names of the functions it invokes. In particular, there are references to consensus-related topics, such as the [block finalization and forks](https://docs.substrate.io/fundamentals/consensus/#finalization-and-forks) and other [consensus mechanisms](https://docs.substrate.io/fundamentals/consensus/#default-consensus-models) such as Aura for block authoring and GRANDPA for finality.


# Introducing to Pop CLI tool

* Github: <https://github.com/r0gue-io/pop-cli>
* Website: <https://pop.r0gue.io/cli/>

Follow this below guide to create a new blockchain with templates from Pop CLI

{% embed url="<https://learn.onpop.io/appchains/guides/create-a-new-parachain>" %}


# Adding a custom logic to runtime

Customize the pallet and add the custom logic.

**Runtime** is where you register a new pallet to add customized logic to your runtime. Runtime is a collection of pallets. For example, core pallets for all Substrate blockchain can be listed:&#x20;

* **Executive pallets:** Orchestration of calls into pallets from the runtime
* **System pallet:** Core types, system utilities and event handling.&#x20;
* **Ecossytem pallets:** Pallet assets, pallet balances, pallet nfts...

<figure><img src="https://2688244615-files.gitbook.io/~/files/v0/b/gitbook-x-prod.appspot.com/o/spaces%2FqpKohKlriBQm0I9cc9k5%2Fuploads%2FZk34xgnEUpOIEbkNsPab%2Fimage.png?alt=media&amp;token=6ae87c72-608d-4fa7-bea5-02a4653735a6" alt=""><figcaption><p>Pallets in the Runtime</p></figcaption></figure>

### Modules

{% content-ref url="/pages/mNlrCLtdTjba4Au0ipYm" %}
[Components of a Pallet](/building-a-blockchain-with-polkadot-sdk/polkadot-sdk/substrate/adding-a-custom-logic-to-runtime/components-of-a-pallet)
{% endcontent-ref %}

{% content-ref url="/pages/vt8cHI5CiB2x6fbBM5BI" %}
[Common runtime modules](/building-a-blockchain-with-polkadot-sdk/polkadot-sdk/substrate/common-runtime-modules)
{% endcontent-ref %}

{% content-ref url="/pages/xNHGUNOT8ngXq6wAh4OJ" %}
[Hooks](/building-a-blockchain-with-polkadot-sdk/polkadot-sdk/substrate/adding-a-custom-logic-to-runtime/hooks)
{% endcontent-ref %}

{% content-ref url="/pages/mQu19bQ1nGGJw3wZQxnu" %}
[Weights & Benchmarking](/building-a-blockchain-with-polkadot-sdk/polkadot-sdk/substrate/adding-a-custom-logic-to-runtime/weights-and-benchmarking)
{% endcontent-ref %}


# Components of a Pallet

* Collection of FRAME pallets: <https://docs.substrate.io/reference/frame-pallets/>

<figure><img src="https://2688244615-files.gitbook.io/~/files/v0/b/gitbook-x-prod.appspot.com/o/spaces%2FqpKohKlriBQm0I9cc9k5%2Fuploads%2FjjzCyRiDrtBQLZDz24vc%2FScreenshot%202024-11-03%20at%2023.03.18.png?alt=media&amp;token=b49eb7c5-76a6-4ee7-b0fe-d9518ee4f69a" alt=""><figcaption><p>Everything you need to know about a pallet in Substrate</p></figcaption></figure>


# Hooks

{% embed url="<https://paritytech.github.io/polkadot-sdk/master/frame_support/traits/trait.Hooks.html>" %}
Documentation about Pallet hooks
{% endembed %}

<figure><img src="https://2688244615-files.gitbook.io/~/files/v0/b/gitbook-x-prod.appspot.com/o/spaces%2FqpKohKlriBQm0I9cc9k5%2Fuploads%2Fu2WXN9OHnkFqkAcDfsVr%2FScreenshot%202024-11-04%20at%2007.41.55.png?alt=media&amp;token=546def45-cf3c-4a73-8fd3-700eb9eda1aa" alt=""><figcaption></figcaption></figure>

* [**OnInitialize**](https://paritytech.github.io/polkadot-sdk/master/frame_support/traits/trait.Hooks.html#method.on_initialize) hooks are only executed when a code change is detected.
* [`OnRuntimeUpgrade`](hooks::OnRuntimeUpgrade) hooks are mandatorily executed at the very beginning of the block body, before any extrinsics are processed.
* [`Inherents`](https://paritytech.github.io/polkadot-sdk/master/sp_inherents/index.html) are always executed before any other other signed or unsigned extrinsics.
* [`OnIdle`](hooks::OnIdle) hooks are executed after extrinsics if there is weight remaining in the block.
* [`OnFinalize`](hooks::OnFinalize) hooks are mandatorily executed after [`OnIdle`](hooks::OnIdle).


# Weights & Benchmarking

* **Weight:** Unit of computation in Substrate
* **Bechmarking:** Calculating the weights required for one pallet dispatchable function to be executed. Substrate benchmarking framework will re-run the logic calls to the dispatchable function defined in `benchmarking.rs` multiple times.&#x20;
  * Dispatchable function weights will be specified in `pallet::weights`&#x20;

The Substrate runtime is composed of distinct pallets, each of which expose various dispatchable functions. The weight of each of these functions are completely independent of one another, and can vary based on the logical path executed based on the inputs and existing state.

To benchmark these runtime functions, we execute them within the actual Wasm runtime, in worst case scenarios. With runtime extrinsics where the input or existing state may effect the complexity of the execution, we test the extrinsic by varying those components and using regression analysis to extract results.

The runtime benchmarks are broken into two pieces:

* Timing Dispatch Function Logic
* Tallying Database Reads and Writes

<figure><img src="https://2688244615-files.gitbook.io/~/files/v0/b/gitbook-x-prod.appspot.com/o/spaces%2FqpKohKlriBQm0I9cc9k5%2Fuploads%2F5Ytqtt9ONBOiNN1lVlwU%2FScreenshot%202024-11-04%20at%2008.01.19.png?alt=media&amp;token=86d66e44-b40a-4601-8a52-e744ce5616bf" alt=""><figcaption><p>Block Import Weight Breakdown</p></figcaption></figure>

### Write & run a benchmarking

```
./target/release/substrate benchmark --chain dev --pallet "*" --extrinsic "*" --steps 0
```

### Resources

* Benchmarking your Substrate pallets: <https://www.youtube.com/watch?v=Qa6sTyUqgek>
* How to retrieve the computational time for resources in Substrate:  <https://github.com/paritytech/substrate/discussions/13098>
* <https://www.shawntabrizi.com/substrate-graph-benchmarks/docs/#/runtime?id=how-the-benchmark-works>


# Extensions


# Signed Extensions

{% embed url="<https://paritytech.github.io/polkadot-sdk/master/sp_runtime/traits/trait.SignedExtension.html>" %}

Substrate provides the concept of **signed extensions** to extend an extrinsic with additional data, provided by the [`SignedExtension`](https://paritytech.github.io/substrate/master/sp_runtime/traits/trait.SignedExtension.html) trait.

The transaction queue regularly calls signed extensions to keep checking that a transaction is valid before it gets put in the ready queue. This is a useful safeguard for verifying that transactions won't fail in a block. They are commonly used to enforce validation logic to protect the transaction pool from spam and replay attacks.

### Reference

{% embed url="<https://docs.rs/crate/pallet-transaction-payment/38.0.0>" %}


# Transaction Extensions

Means by which a transaction may be extended. This type embodies both the data and the logic that should be additionally associated with the transaction. It should be plain old data.

{% embed url="<https://paritytech.github.io/polkadot-sdk/master/polkadot_sdk_frame/traits/trait.TransactionExtension.html>" %}

Transaction extensions are capable of defining logic which is executed additionally to the dispatch of the call:

* They may define logic which must be executed prior to the dispatch of the call.
* They may also define logic which must be executed after the dispatch of the call.

{% embed url="<https://forum.polkadot.network/t/introducing-transactionextension/10827>" %}


# Common runtime modules

{% embed url="<https://docs.substrate.io/reference/frame-pallets/>" %}


# Runtime API and RPC

Substrate nodes consist of <mark style="background-color:orange;">**outer node services and a runtime**</mark> and this separation of responsibilities is an important concept for designing Substrate-based chains and building upgradeable logic. However, the outer node services and the runtime must communicate with each other to complete many critical operations, <mark style="color:blue;">**including reading and writing data and performing state transitions**</mark>. \
\
The outer node services communicate with the runtime by calling **runtime application programming interfaces (Runtime API)** to perform specific tasks.

<figure><img src="https://2688244615-files.gitbook.io/~/files/v0/b/gitbook-x-prod.appspot.com/o/spaces%2FqpKohKlriBQm0I9cc9k5%2Fuploads%2FCfxKChB6AtatoXaST38g%2FScreenshot%202024-11-22%20at%2000.35.56.png?alt=media&amp;token=df5b3a77-bb0e-4f17-9519-f2ce87d86bb1" alt=""><figcaption><p>How Runtime and Outer Node Services communicate mutually?</p></figcaption></figure>


# Runtime upgrade

{% embed url="<https://wiki.polkadot.network/docs/learn-runtime-upgrades>" %}

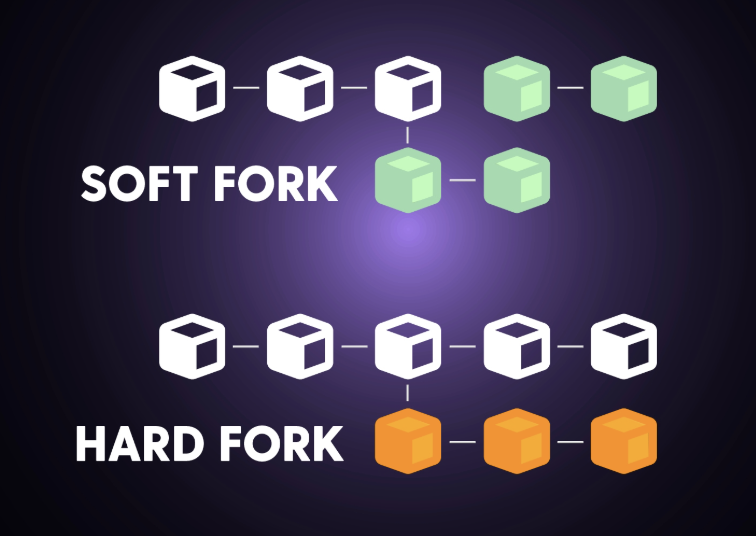
You may have encountered the term **"hard fork"** before in the blockchain space. A **hard fork** occurs when a blockchain's logic changes such that nodes that do not include the new changes cannot remain in consensus with nodes that do. Such changes are backward incompatible. Hard forks can be political due to the nature of the upgrades and logistically demanding due to the number (potentially thousands) of nodes in the network that need to upgrade their software.&#x20;

Thus, hard forking is slow, inefficient, and error-prone due to the levels of offline coordination required and, therefore, the propensity to bundle many upgrades into one large-scale event.

* [Link to the DAO hard fork](https://en.wikipedia.org/wiki/The_DAO)

<figure><img src="https://2688244615-files.gitbook.io/~/files/v0/b/gitbook-x-prod.appspot.com/o/spaces%2FqpKohKlriBQm0I9cc9k5%2Fuploads%2F86LeiuacrNxC7htT2hpR%2FScreenshot%202024-11-25%20at%2012.15.03.png?alt=media&amp;token=297ab727-66be-48dc-b854-f75d12f038ea" alt=""><figcaption><p>Soft Fork and Hard Fork</p></figcaption></figure>

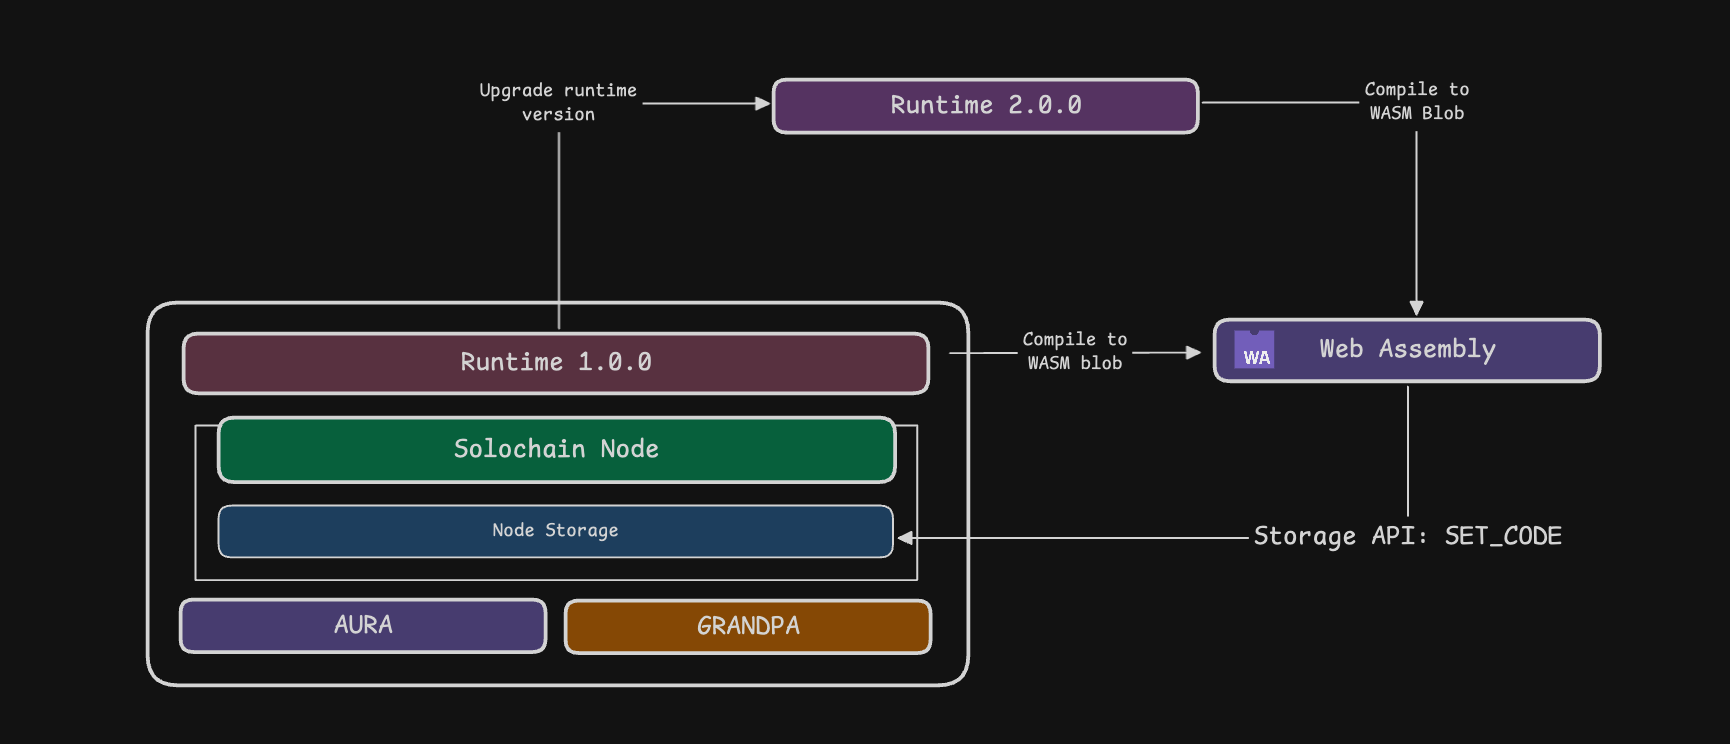
The usage of [WebAssembly](https://wiki.polkadot.network/docs/learn-wasm) in the Polkadot SDK (the framework powering Polkadot, Kusama and their respective parachains), give the relay chain, its parachains, as well as any other standalone solo chains built with the Polkadot SDK the ability to upgrade their runtime (the chain's "business logic") without a hard fork of the respective network.

* [Link to FRAME runtime upgrades and migrations](https://paritytech.github.io/polkadot-sdk/master/polkadot_sdk_docs/reference_docs/frame_runtime_upgrades_and_migrations/index.html)

Rather than encoding the runtime in the nodes, Polkadot nodes contain a WebAssembly [execution host](https://wiki.polkadot.network/docs/learn-polkadot-host). They maintain consensus on a very low-level and well-established instruction set. Upgrades can be small, isolated, and very specific by deploying WebAssembly on-chain and having nodes auto-enact the new logic at a particular block height. The runtime is stored on the blockchain itself.&#x20;

<figure><img src="https://2688244615-files.gitbook.io/~/files/v0/b/gitbook-x-prod.appspot.com/o/spaces%2FqpKohKlriBQm0I9cc9k5%2Fuploads%2FV26hm743Y7JpemNDoA8z%2FScreenshot%202024-11-25%20at%2012.00.19.png?alt=media&amp;token=0fc794ee-1712-4419-9b60-a3efe28791a7" alt=""><figcaption><p>Forkless Runtime Upgrade in Substrate</p></figcaption></figure>

### Decentralized Polkadot runtime upgrade

Polkadot can upgrade its runtime by upgrading the logic stored on-chain and removes the coordination challenge of requiring thousands of node operators to upgrade in advance of a given block number. Polkadot stakeholders propose and approve upgrades through the [on-chain governance](https://wiki.polkadot.network/docs/learn-polkadot-opengov) system, which also enacts them autonomously once the runtime upgrade referendum is approved through on-chain voting.

As a result of storing the runtime as part of the state, the runtime code itself becomes state sensitive, and calls to runtime can change the runtime code itself. Therefore, the Polkadot Host must always ensure it provides the runtime corresponding to the state in which the entry point has been called.


# Bump Polkadot SDK versions

Upgrading a Substrate-based or parachain blockchain codebase can be a daunting task for even the most seasoned engineers. The challenge doesn’t just lie in keeping up with the latest releases of the **Polkadot SDK**, but also in dealing with the inevitable breaking changes and regressions that occur in Substrate’s underlying libraries—issues that aren’t necessarily the fault of your own code.

This guide is designed to serve as a reference for Substrate engineers tasked with performing these complex upgrades. Drawing on lessons learned from upgrading the *pop-node (Pop Network)* codebase from **version 1.7.0 to stable2407**—an eight-version leap—this article will walk you through the process, sharing tips and tricks to smooth out the upgrade path.

* Upgrade pop-node from **1.7.0 to 1.14.0** PR: <https://github.com/r0gue-io/pop-node/pull/178>
* Upgrade pop-node from **1.14.0 to stable2407**: <https://github.com/r0gue-io/pop-node/pull/234>

Tools that you definitely need for an upgrade

* psvm - Polkadot SDK Version Manager: [https://github.com/paritytech/psvm/](https://github.com/paritytech/psvm/tree/main/src)

You won't know how painful it is without `psvm` so always remember that there is a tool exists. `psvm` helps to manage all your Substrate dependencies in synced together with the provided version. With just one command and you are ready to go:

```zsh
psvm -v "1.14.0"
```

* zepster - Analyze, Fix and Format features in your Rust workspace: <https://github.com/ggwpez/zepter>

Another useful tool from Parity contribute to Rust & Polkadot ecosystem. Sometimes you don't know which features that you are missing after version bumps from running psvm or which features that are deprecated. So it is smarter to have a tool handle that for you.

### Steps for the codebase upgrade <a href="#steps-for-the-codebase-upgrade" id="steps-for-the-codebase-upgrade"></a>

#### Step 1: Running psvm to bump version of [Polkadot SDK](https://github.com/paritytech/polkadot-sdk) dependencies <a href="#step-1-running-psvm-to-bump-version-of-polkadot-sdk-dependencies" id="step-1-running-psvm-to-bump-version-of-polkadot-sdk-dependencies"></a>

Running psvm command to bump versions of your codebase dependencies. Notice that this tool only cover dependencies under the Polkadot SDK repository.

Other crates are not covered by it so you will have to handle version bumps for these crates manually, don't worry, most of the time, there won't be any issues if you don't handle an upgrade for these crates. But what happen if there is an unexpected conflicts in these crates?

#### Step 2: Check & synchronize with the Polkadot SDK Release Changelog <a href="#step-2-check--synchronize-with-the-polkadot-sdk-release-changelog" id="step-2-check--synchronize-with-the-polkadot-sdk-release-changelog"></a>

* Polkadot SDK Releases: <https://github.com/paritytech/polkadot-sdk/releases>

As an open-source repository, every new update of Polkadot SDK is gathered in a release page on the Github repository. You can check the link that I attach above. So as an user of the Polkadot SDK, how can you use this release page for your upgrade?

1. First, you will need to find the release of a version you are upgrading to, for example, if you are upgrading to 1.9.0, you will need to find Polkadot v1.9.0: <https://github.com/paritytech/polkadot-sdk/releases/tag/polkadot-v1.9.0>
2. Now take a look at the Changelog section of the release.

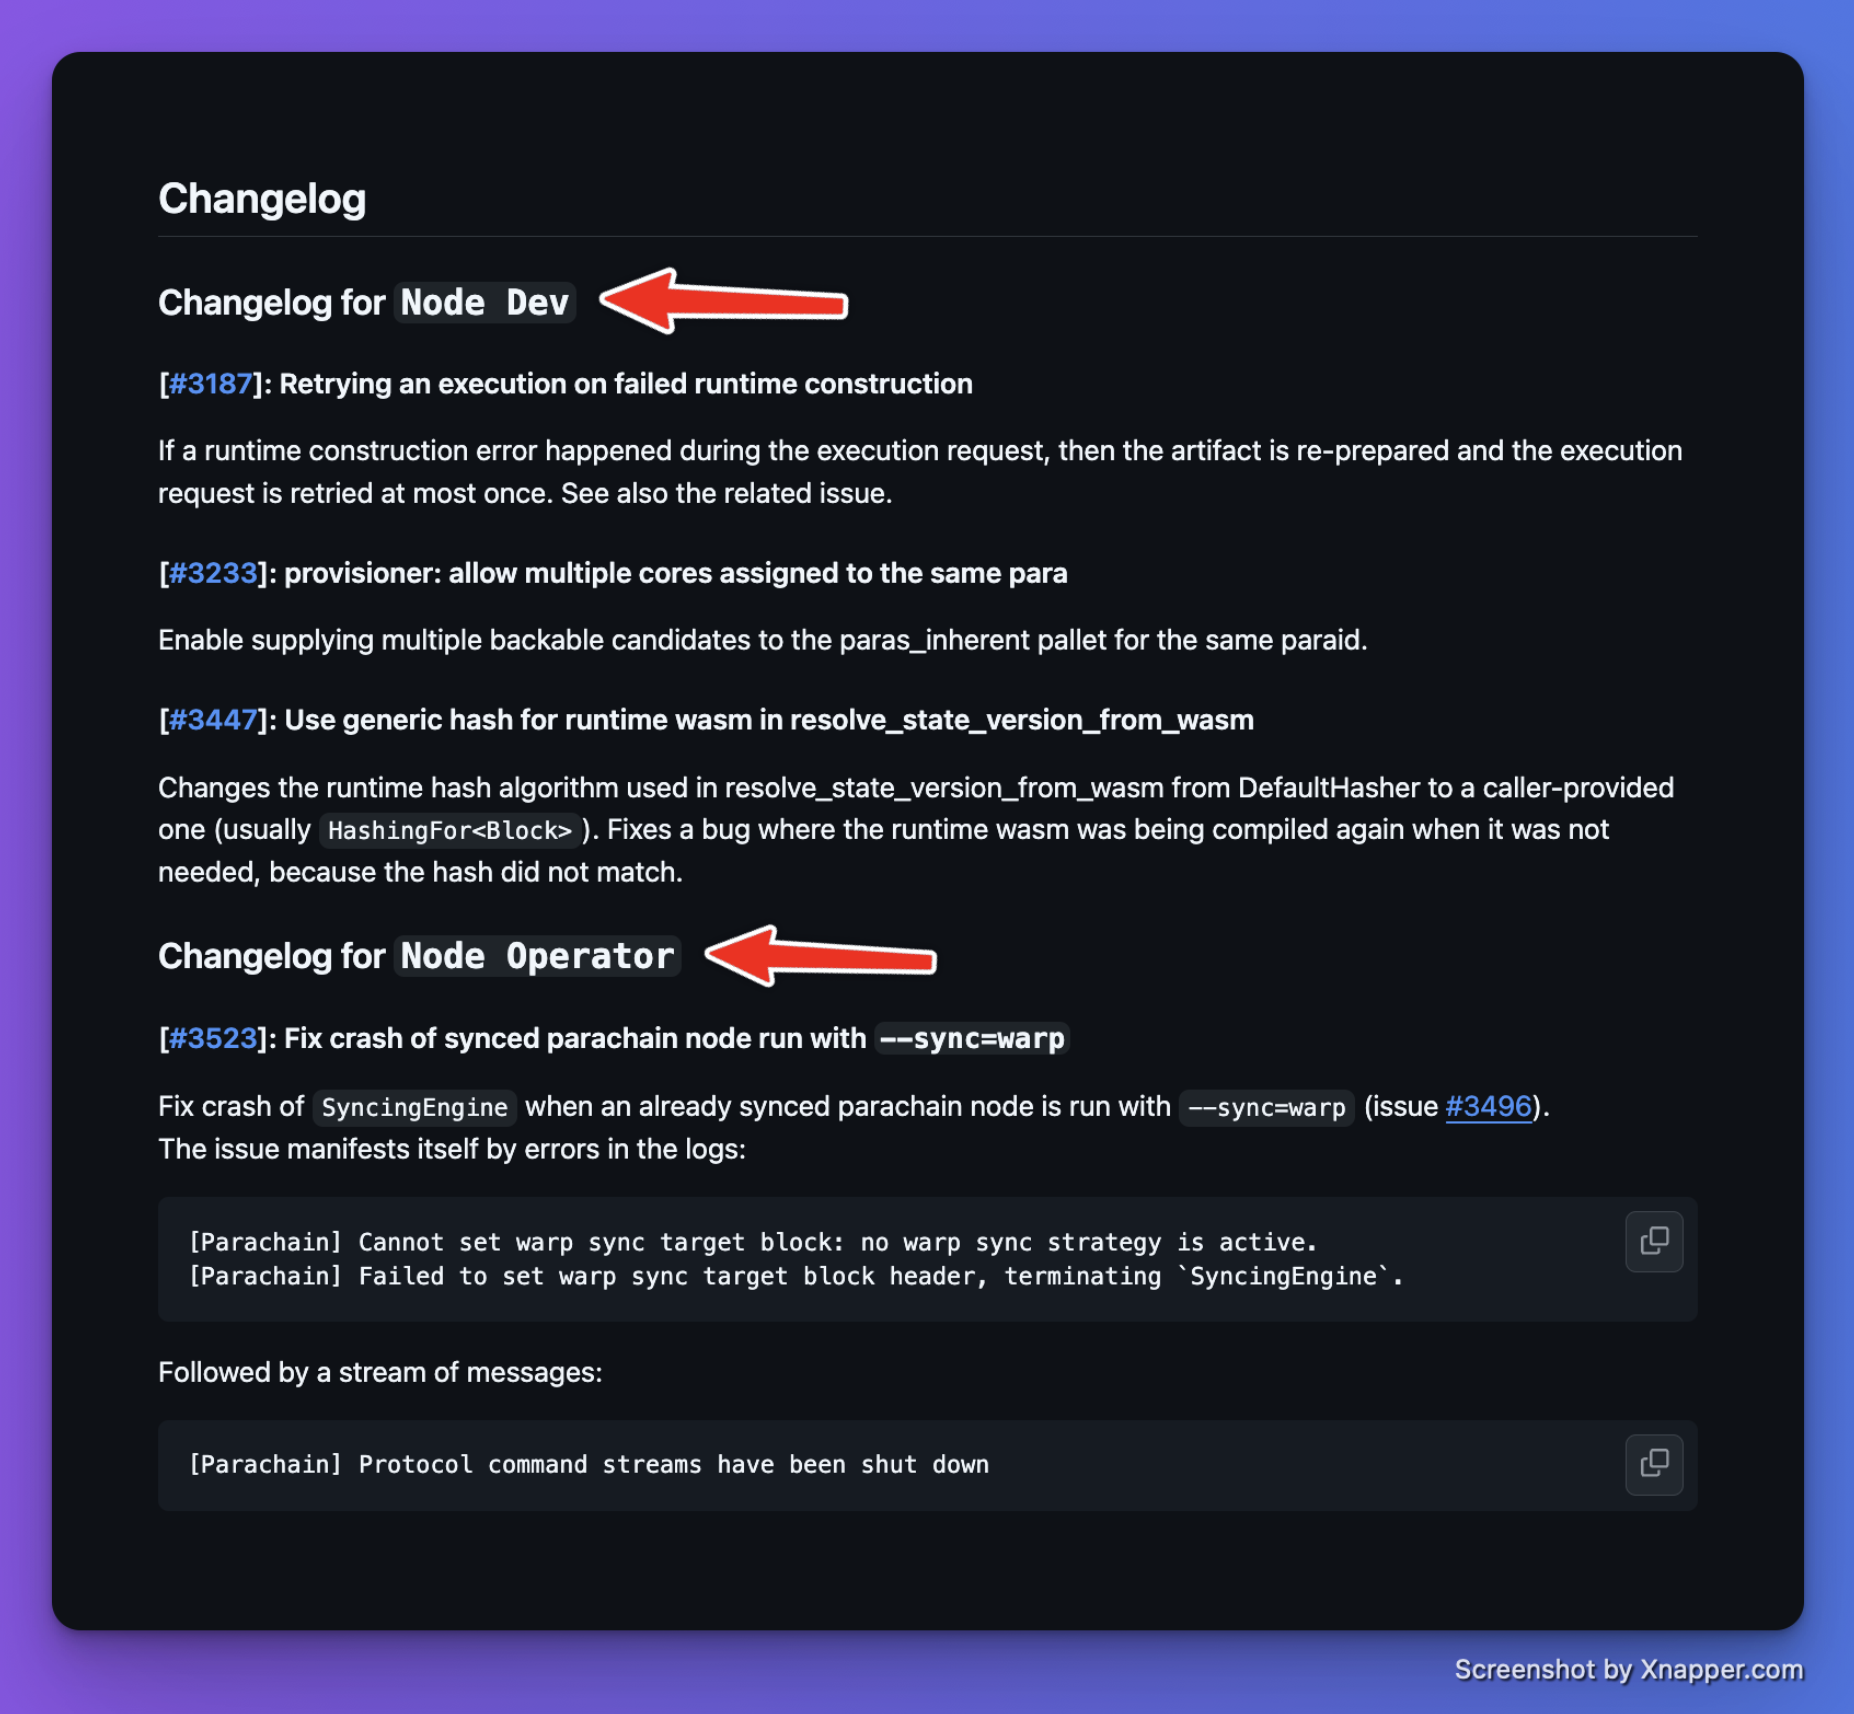
<figure><img src="https://blog.chungquantin.com/_next/image?url=%2Fstatic%2Fimages%2Fupgrade-polkadot-version-1.png&#x26;w=3840&#x26;q=75" alt=""><figcaption></figcaption></figure>

The Changelog section includes two two sub-sections

**Changelog for `Node Dev`**

This section focuses on changes related to node development. If your node doesn't have any significant updates, you can typically follow the release changelog and address any adjustments for your node accordingly.

However, if there are critical changes, it's important to carefully evaluate this section. Ensure that core node functionalities, such as node handshaking, P2P networking, and the underlying database, are thoroughly reviewed and remain intact.

> If you've replaced your existing node with the **omni-node**, you likely won't need to make any changes to the node at all.

**Changelog for `Runtime Dev`**

Similarly, this section covers changes related to runtime development. It includes updates such as new pallet configurations, added features, or new storage fields within the pallet. All runtime-related modifications will be addressed here.

It's important to note that changes to the runtime must be thoroughly reviewed. If anything is incorrect, such as using the wrong data type for a storage field, a runtime migration will be required to fix the issue. This is more complicated than the node case, as you just need to replace the binary of the node if there is something wrong happens.

However, changes to the runtime layer are usually straightforward, often limited to pallet configurations or the runtime API. As a result, they tend to be easier to review and apply compared to node-level changes, which are more complex.

#### Step 3: Compare changes with an existing up-to-date codebase <a href="#step-3-compare-changes-with-an-existing-up-to-date-codebase" id="step-3-compare-changes-with-an-existing-up-to-date-codebase"></a>

Having an existing example to compare reduces bugs and unrecognized changes a lot during this process, so you better find an existing codebase that is already updated to the version that you are working on.

In R0GUE, we reference from a repository `base-parachain` which is used as a template for `pop-cli` - a tool for seamless Polkadot development.

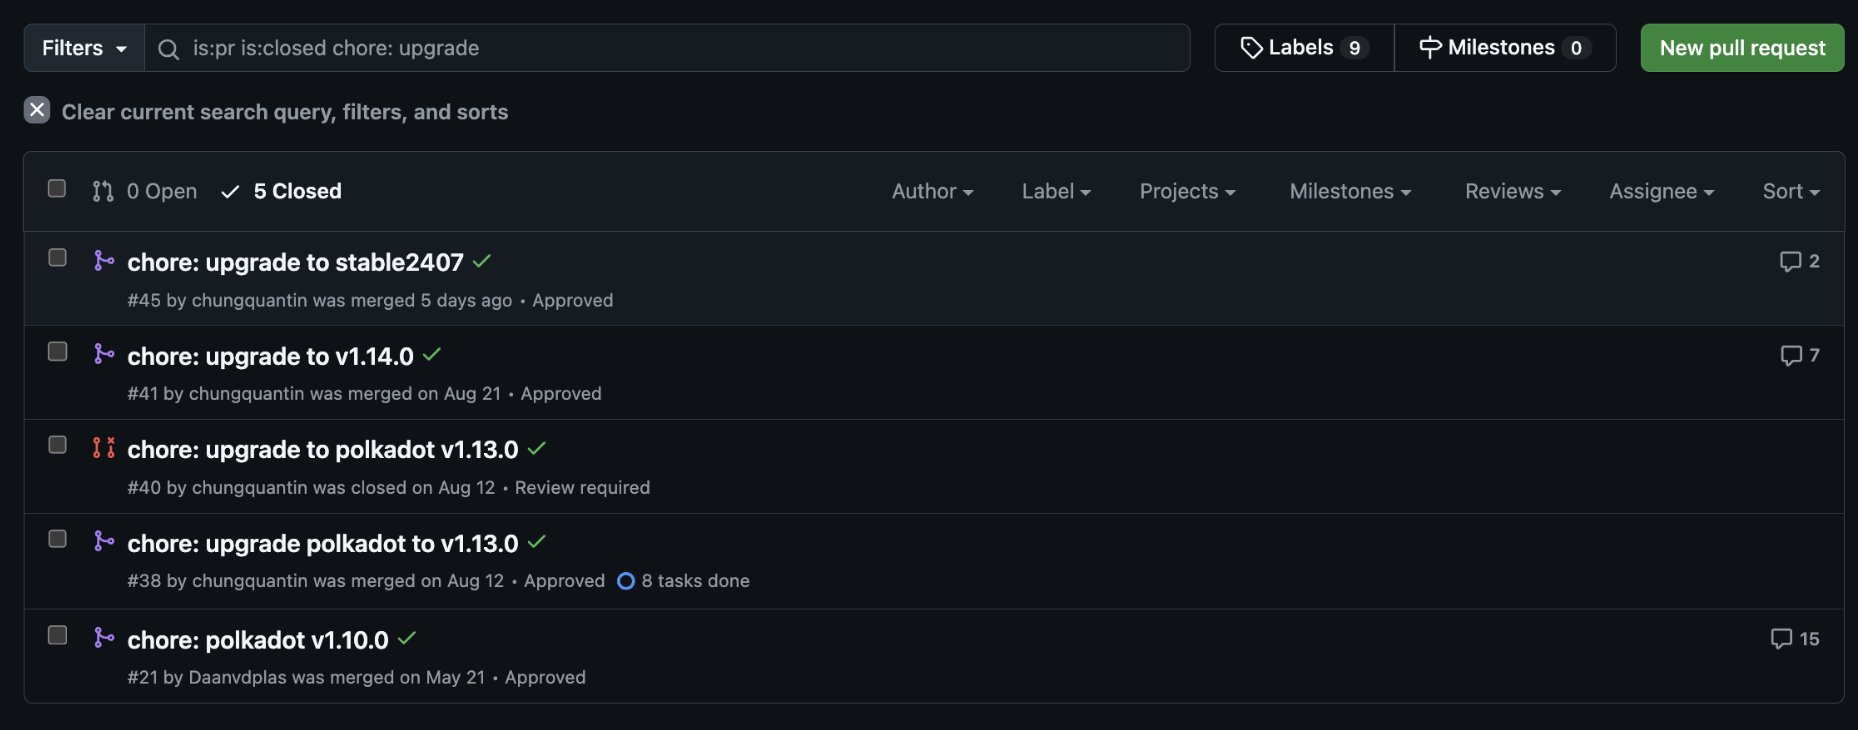
* **base-parachain: upgrade polkadot to 1.14.0:** <https://github.com/r0gue-io/base-parachain/pull/41> - If you are upgrading to 1.14.0, you can consider taking a look at this PR to see the changes made and compare with what you have done in the step 2.

<figure><img src="https://blog.chungquantin.com/_next/image?url=%2Fstatic%2Fimages%2Fupgrade-polkadot-version-2.png&#x26;w=3840&#x26;q=75" alt=""><figcaption></figcaption></figure>

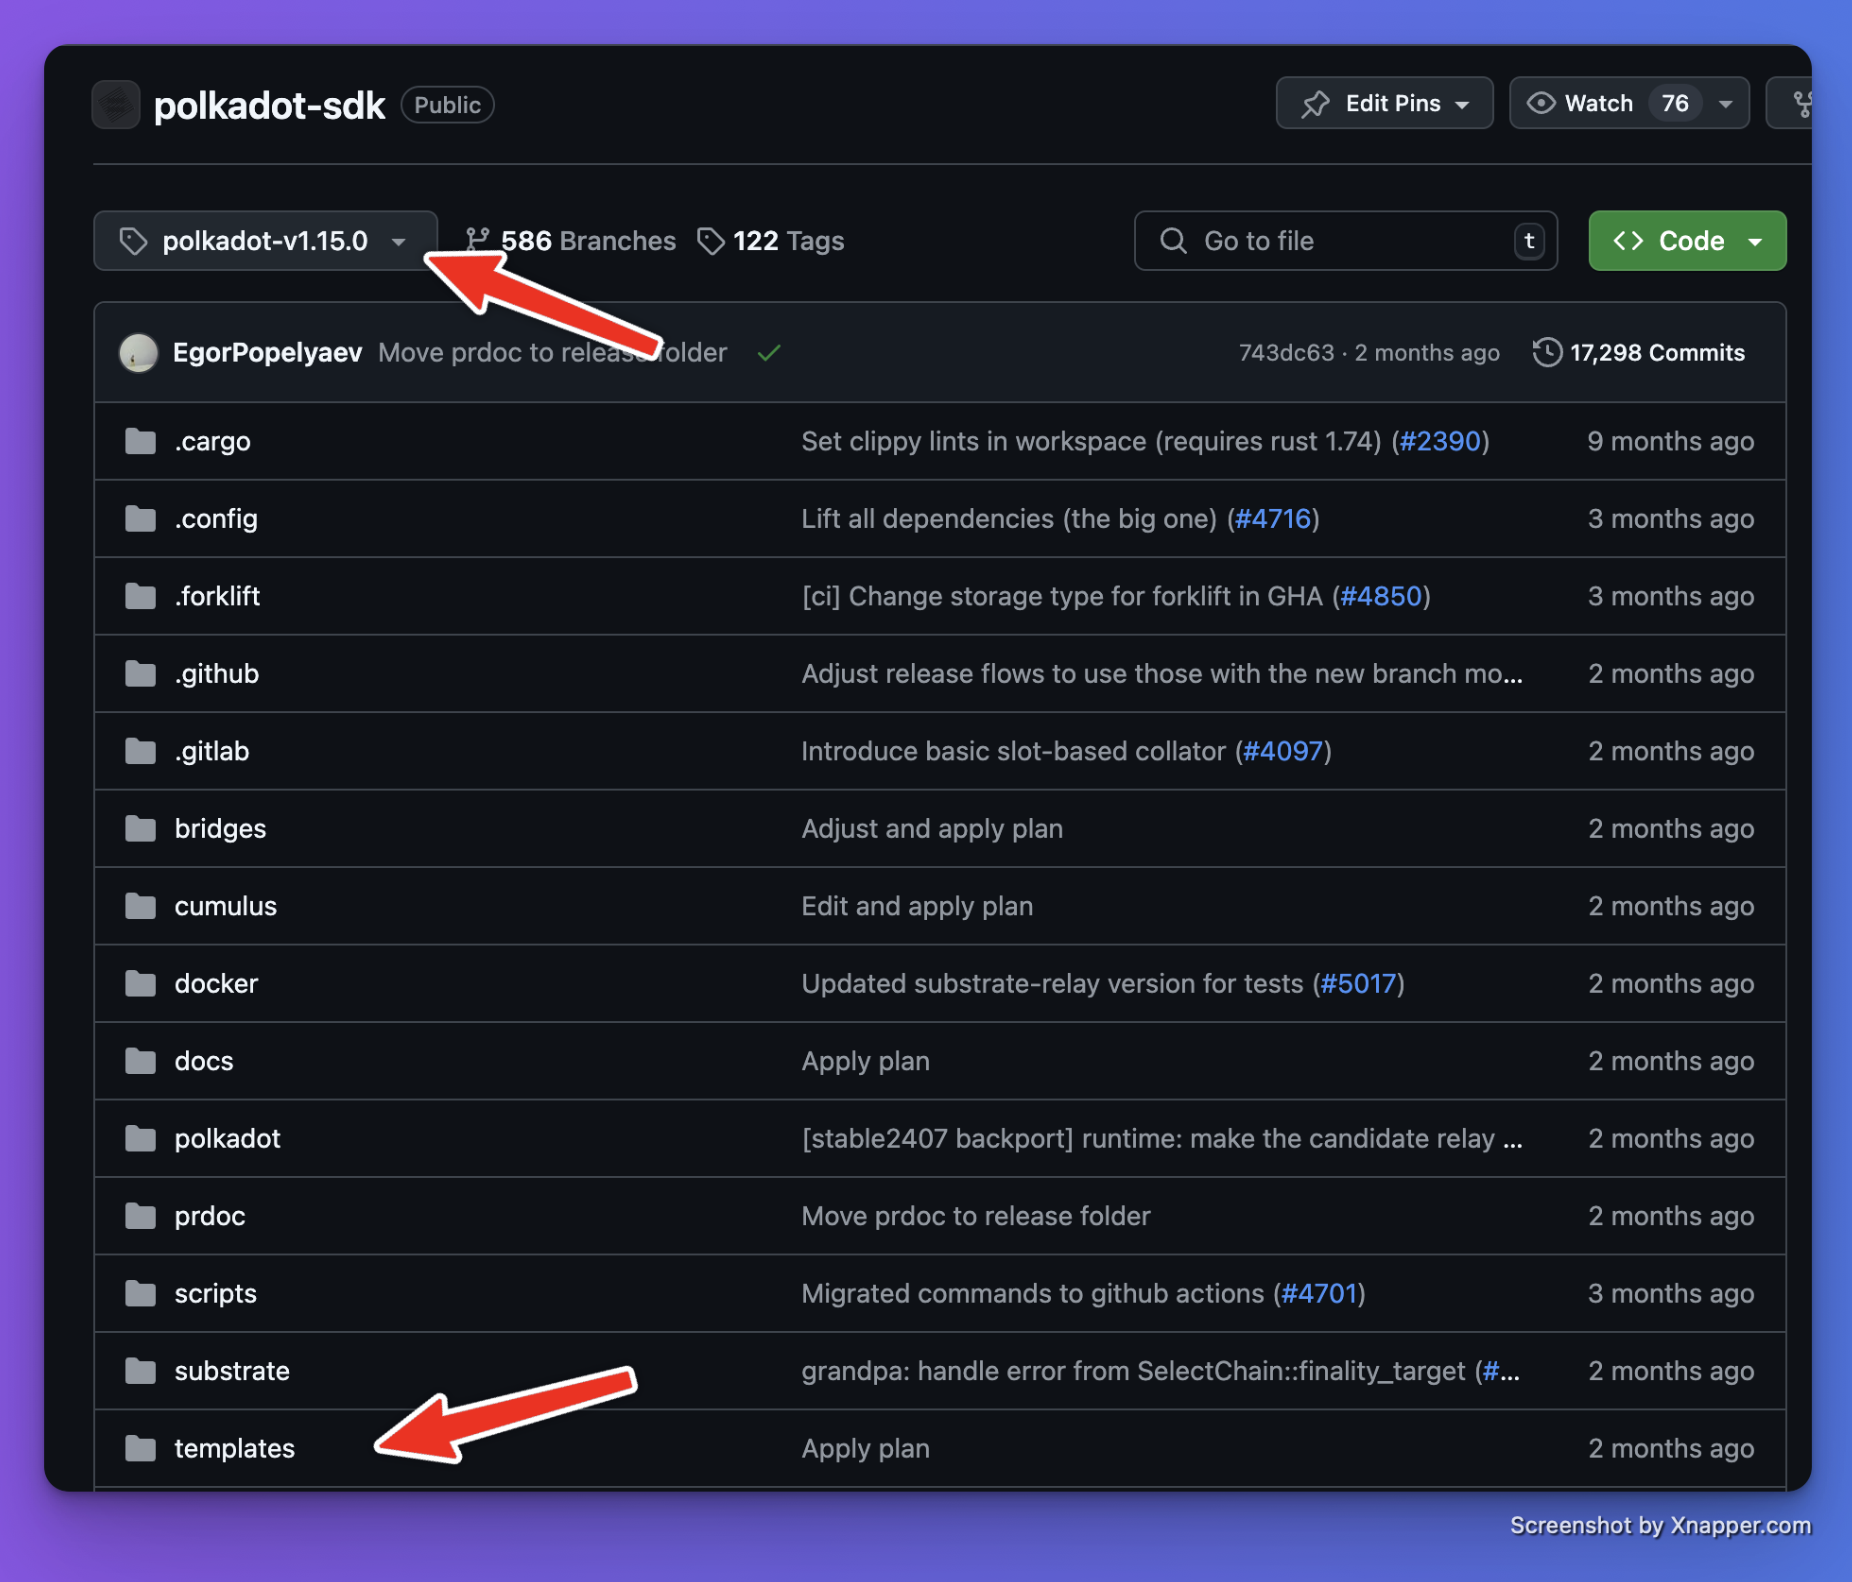
* One official source is the Polkadot SDK template. You can visit Polkadot SDK > Select the version tag you are working on > Go to `templates` folder. In here, you can find the parachain template and minimal template, view the commit history of these templates and compare the changes made **between your current version tag with the targeted version tag**.

<figure><img src="https://blog.chungquantin.com/_next/image?url=%2Fstatic%2Fimages%2Fupgrade-polkadot-version-3.png&#x26;w=3840&#x26;q=75" alt=""><figcaption></figcaption></figure>

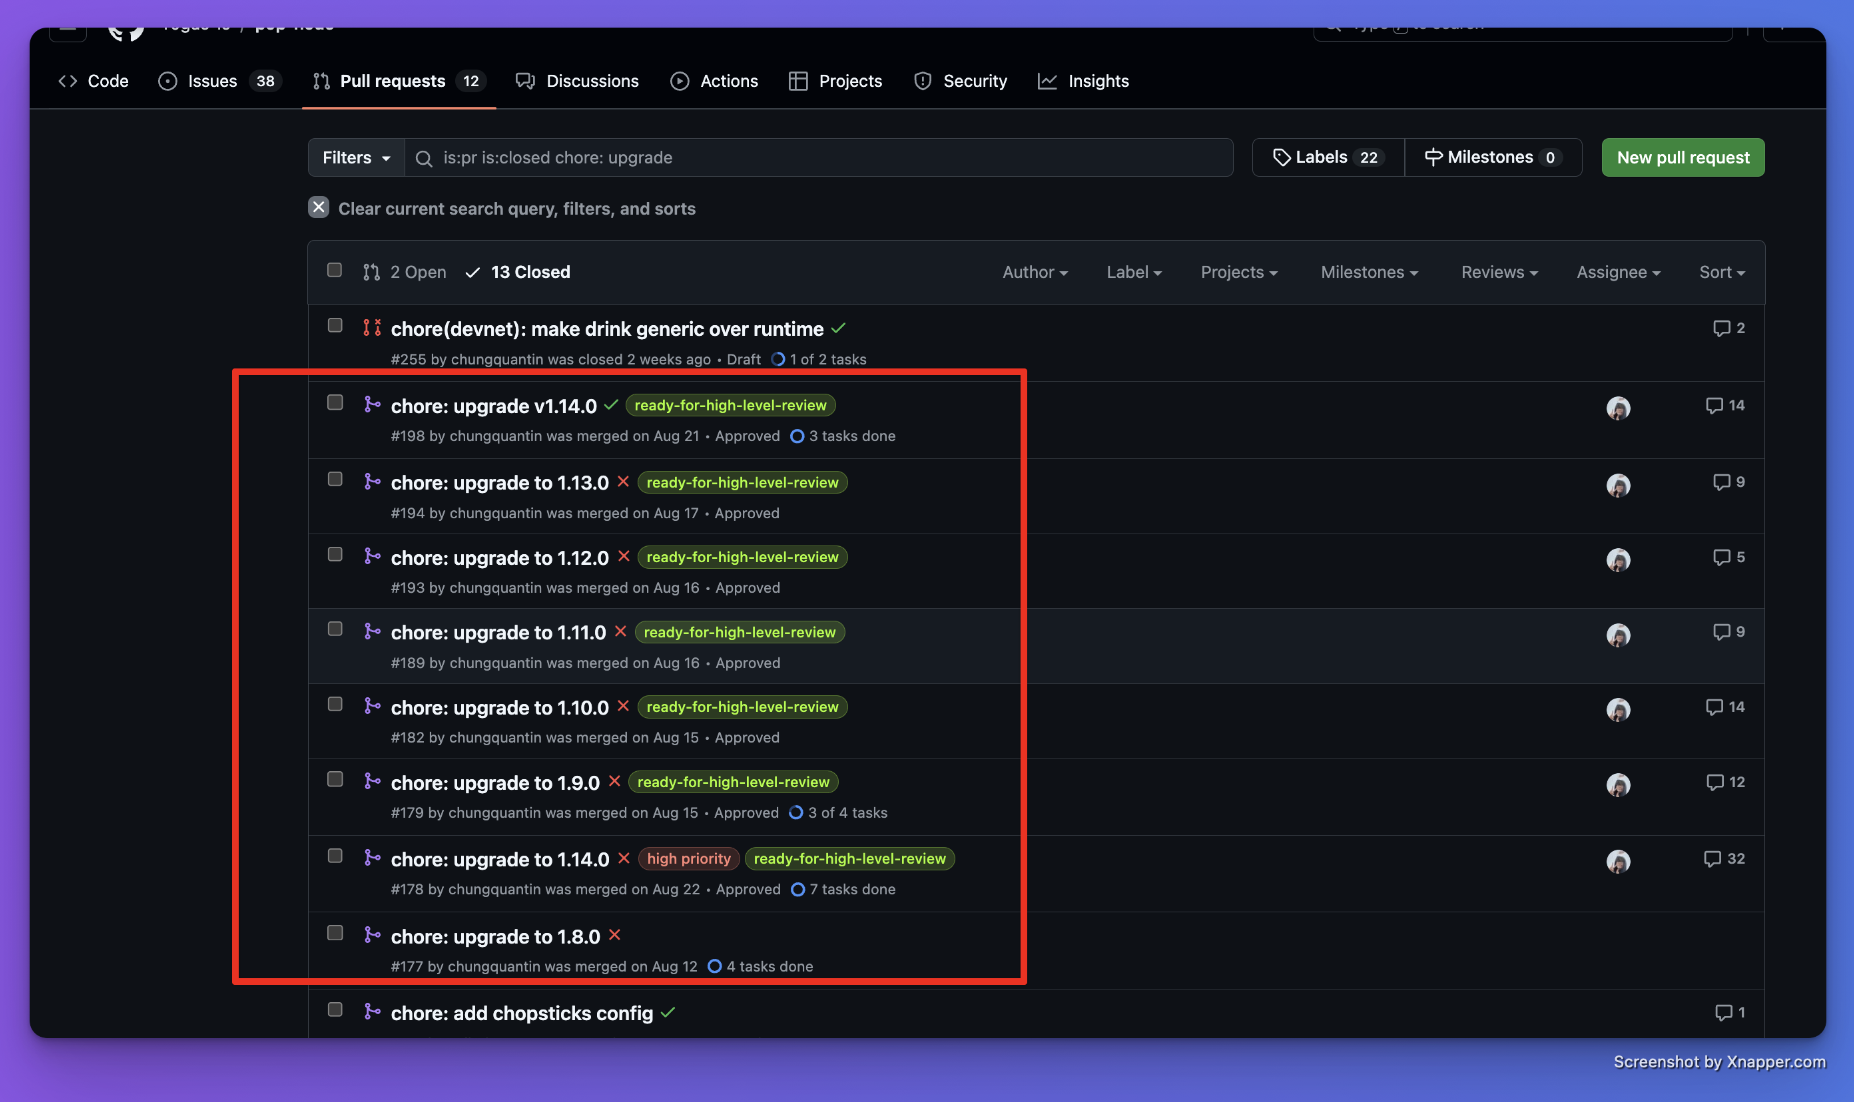
* The another good reference is the **production-ready parachain codebase**, engineers from these parachain team spent a lot of time to review the PR.

<figure><img src="https://blog.chungquantin.com/_next/image?url=%2Fstatic%2Fimages%2Fupgrade-polkadot-version-4.png&#x26;w=3840&#x26;q=75" alt=""><figcaption></figcaption></figure>

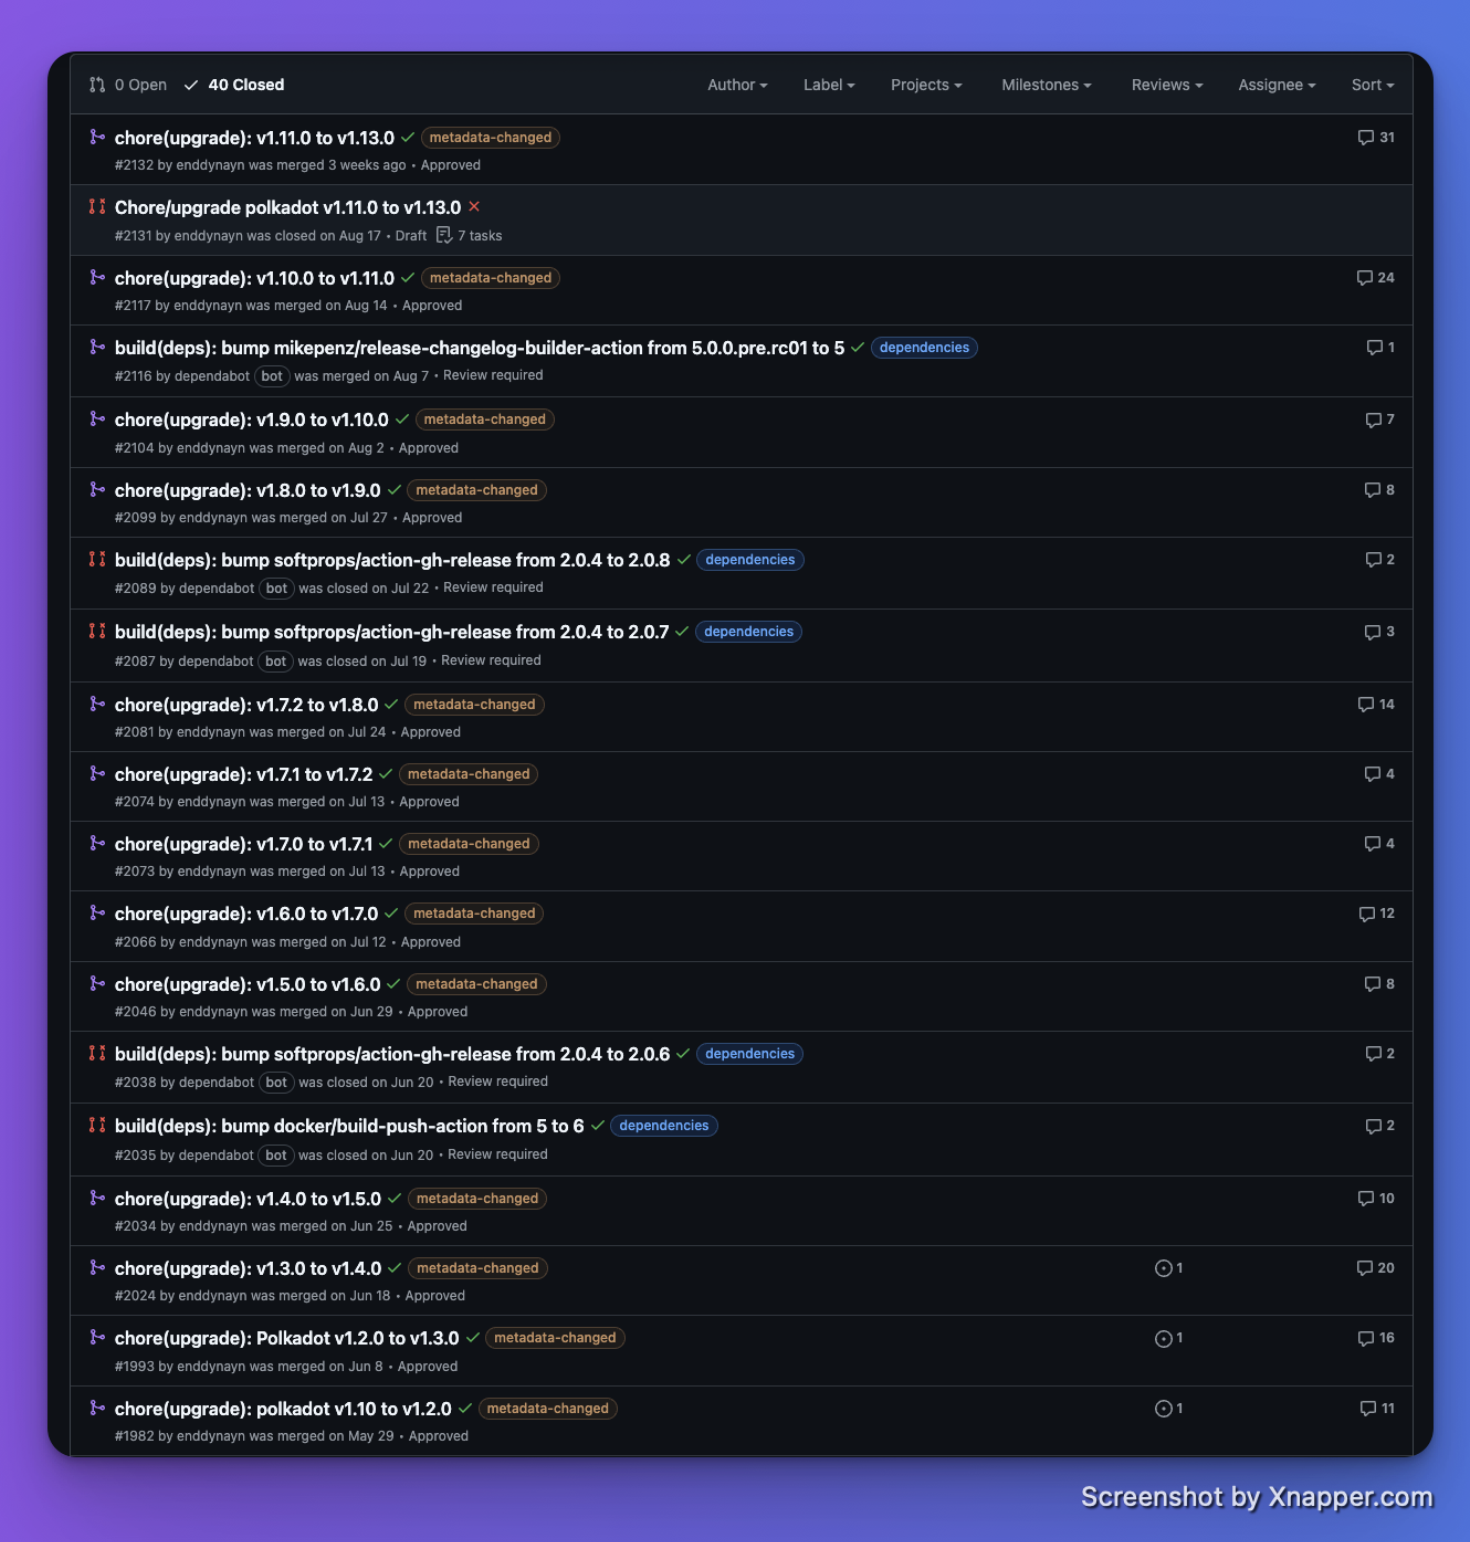
Most team follow the conventional commit rule (<https://www.conventionalcommits.org/en/v1.0.0/>) so you can filter out closed PRs that starts with `chore` or includes `upgrade` to find past PRs.

For example, below are closed [PRs from Frequency](https://github.com/frequency-chain/frequency/pulls?q=is%3Apr+is%3Aclosed+chore%28upgrade%29) that follows the pattern `chore(upgrade)`.

<figure><img src="https://blog.chungquantin.com/_next/image?url=%2Fstatic%2Fimages%2Fupgrade-polkadot-version-5.png&#x26;w=3840&#x26;q=75" alt=""><figcaption></figcaption></figure>

### Tips & Tricks <a href="#tips--tricks" id="tips--tricks"></a>

#### For a large version bump (maybe from 1.0.0 to 1.15.0 👀), use a tool from Tanssi to track all the changes <a href="#for-a-large-version-bump-maybe-from-100-to-1150--use-a-tool-from-tanssi-to-track-all-the-changes" id="for-a-large-version-bump-maybe-from-100-to-1150--use-a-tool-from-tanssi-to-track-all-the-changes"></a>

<https://github.com/moondance-labs/tanssi/blob/master/tools/github/print-version-bump-info.ts>

Tanssi has an internal code to print the version bump information between two versions. For example, <https://github.com/moondance-labs/tanssi/issues/580> that prints all the changes made to the Polkadot SDK from 1.7.0 to 1.10.0.

> Tip: If you are in this position to make a large version bump, you should consider using this tool from Tanssi to track the changes as well.

#### Odd things happened in the mismatched patch version after running `psvm` <a href="#odd-things-happened-in-the-mismatched-patch-version-after-running-psvm" id="odd-things-happened-in-the-mismatched-patch-version-after-running-psvm"></a>

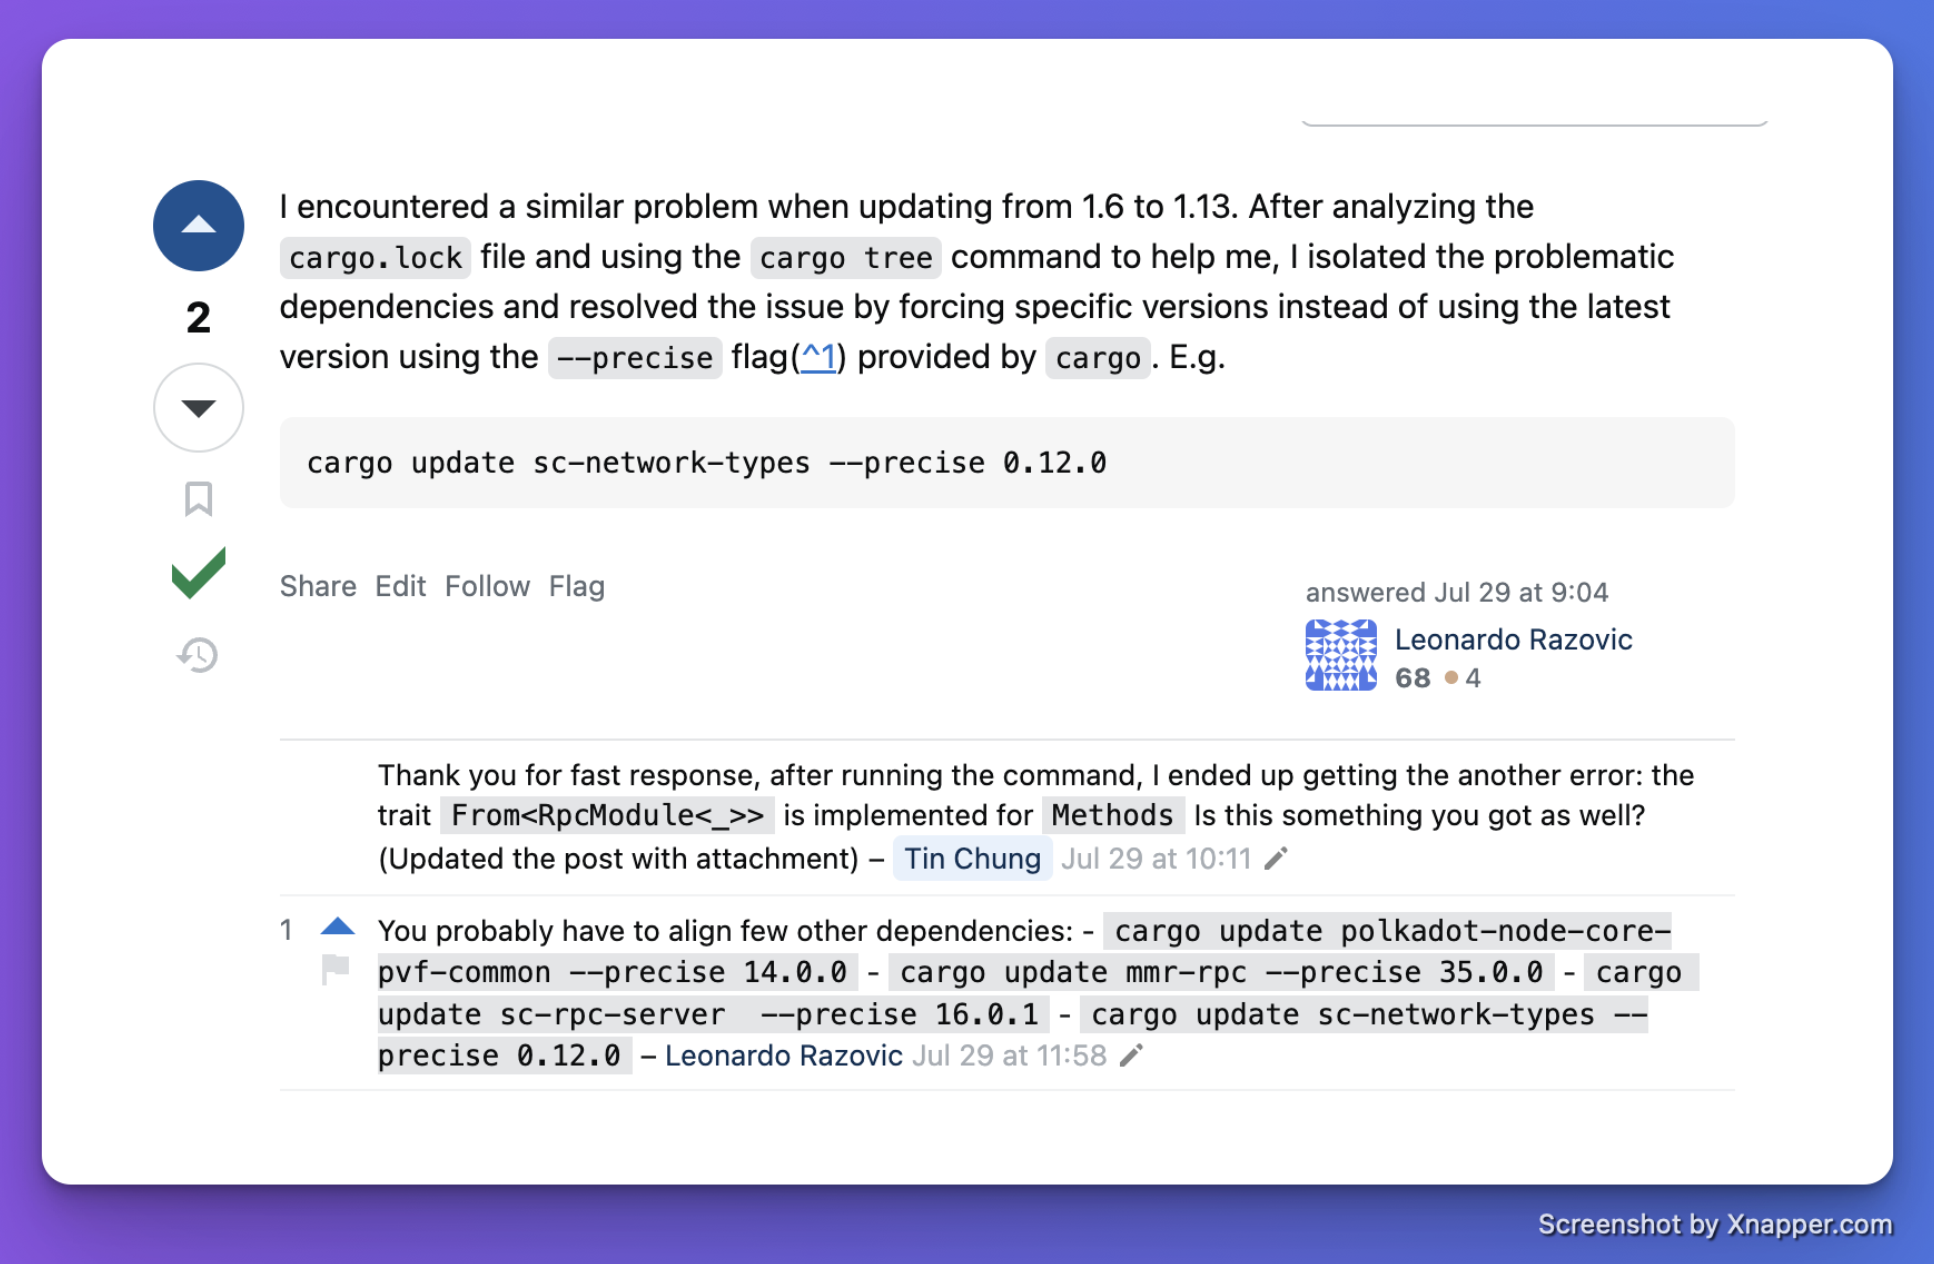
For a detailed context, please take a look at this SE post for an issue with upgrading to v1.13.0 (the PR that took me hours and help from colleagues to resolve): <https://substrate.stackexchange.com/questions/11774/unable-to-compile-upgrade-parachain-node-after-running-psvm-v1-13-0>

<figure><img src="https://blog.chungquantin.com/_next/image?url=%2Fstatic%2Fimages%2Fupgrade-polkadot-version-6.png&#x26;w=3840&#x26;q=75" alt=""><figcaption></figcaption></figure>

Many dependencies need to be updated with `precise` flag due to the mismatches in patch version of the dependencies.

To me, this is the most frustrated experience. It is quite hard to figure out the root cause when you are flooded with hundreds of dependencies when running `cargo tree`.

> Tip: A great tip I received is to clone a working repository and use the `diff` command to compare your `Cargo.lock` file with the one from the working repository. This helps identify any mismatches in dependencies, ensuring everything is aligned and identical.

#### Consider using **omni-node** if possible, this will make your life much better. <a href="#consider-using-omni-node-if-possible-this-will-make-your-life-much-better" id="consider-using-omni-node-if-possible-this-will-make-your-life-much-better"></a>

Polkadot Forum Post about omni-node: <https://forum.polkadot.network/t/polkadot-parachain-omni-node-gathering-ideas-and-feedback/7823/23>

At the time this article was written, the **omni-node** is still WIP (work in progress). But you can already replace your current node with the **omni-node** since polkadot release version **1.11.0**.

Maintaining the node is a tiresome experience for any parachain team, most of the time it brings up more issues that you have to handle aside from your core runtime functionalities.

With the release of the **omni-node**, you don't have to care much about constructing your own node and maintain it. Hence, if you do an upgrade for the node, you just simply replace the **omni-node 1.11.0** (example) to **omni-node 1.14.0**.


# Cumulus


# Introduction to Cumulus

{% embed url="<https://github.com/paritytech/polkadot-sdk/tree/master/cumulus>" %}
Official documentation of Cumulus
{% endembed %}

{% embed url="<https://paritytech.github.io/polkadot-sdk/master/polkadot_sdk_docs/polkadot_sdk/cumulus/index.html>" %}

<figure><img src="https://2688244615-files.gitbook.io/~/files/v0/b/gitbook-x-prod.appspot.com/o/spaces%2FqpKohKlriBQm0I9cc9k5%2Fuploads%2F9TUFzkIjZFBxMpdbj8R6%2FScreenshot%202024-11-05%20at%2008.17.21.png?alt=media&amp;token=e6892eef-9d3d-4a41-a67e-e0065eff3ae2" alt=""><figcaption></figcaption></figure>

### What is Cumulus?

A set of tools for writing [Substrate](https://substrate.io/)-based [Polkadot](https://wiki.polkadot.network/en/) [parachains](https://wiki.polkadot.network/docs/en/learn-parachains). Refer to the included [overview](https://github.com/paritytech/polkadot-sdk/blob/master/cumulus/docs/overview.md) for architectural details, and the [Connect to a relay chain how-to guide](https://docs.substrate.io/reference/how-to-guides/parachains/connect-to-a-relay-chain/) for a guided walk-through of using these tools.

It's easy to write blockchains using Substrate, and the overhead of writing parachains' distribution, p2p, database, and synchronization layers should be just as low. This project aims to make it easy to write parachains for Polkadot by leveraging the power of Substrate.

Cumulus clouds are shaped sort of like dots; together they form a system that is intricate, beautiful and functional.

#### Consensus

[`parachain-consensus`](https://github.com/paritytech/polkadot-sdk/blob/master/cumulus/client/consensus/common/src/parachain_consensus.rs) is a [consensus engine](https://docs.substrate.io/v3/advanced/consensus) for Substrate that follows a Polkadot [relay chain](https://wiki.polkadot.network/docs/en/learn-architecture#relay-chain). This will run a Polkadot node internally, and dictate to the client and synchronization algorithms which chain to follow, [finalize](https://wiki.polkadot.network/docs/en/learn-consensus#probabilistic-vs-provable-finality), and treat as best.

#### Collator

A Polkadot [collator](https://wiki.polkadot.network/docs/en/learn-collator) for the parachain is implemented by the `polkadot-parachain` binary (previously called `polkadot-collator`).

You may run `polkadot-parachain` locally after building it or using one of the container option described [here](https://github.com/paritytech/polkadot-sdk/blob/master/cumulus/docs/contributor/container.md).

### Resources

{% embed url="<https://docs.substrate.io/tutorials/build-a-parachain/connect-a-local-parachain/>" %}


# Parachain from scratch

{% embed url="<https://github.com/chungquantin/parachain-from-scratch?tab=readme-ov-file>" %}

## Create a Parachain from scratch

<figure><img src="https://2688244615-files.gitbook.io/~/files/v0/b/gitbook-x-prod.appspot.com/o/spaces%2FqpKohKlriBQm0I9cc9k5%2Fuploads%2Fn9W6ddrQkV4JG72m6uvl%2Fimage.png?alt=media&amp;token=6a134ac5-1d36-42d4-9abf-5a5ab47bd2b7" alt=""><figcaption></figcaption></figure>

The repository contains two nodes \`parachain-node\` and \`solochain-node\` and one \`runtime\`. The goal of this tutorial is to help you convert your Substrate runtime to be compatible with the \`parachain-node\` and register a new parachain on the PASEO testnet.&#x20;

### Getting started

First step is to follow all the TODOs in the repository and convert your \`solochain-runtime\` to a \`parachain-runtime\` until it works with the \`parachain-node\`. To test the the local relaychain network, run the below command:

```
pop up parachain -f ./network.toml
```

If you are not familiar with the \`pop-cli\` tool, learn more in here: <https://github.com/r0gue-io/pop-cli>&#x20;

{% content-ref url="/pages/Ccn8Z3WhlT0GIhx04EXm" %}
[Break down the node architecture](/building-a-blockchain-with-polkadot-sdk/polkadot-sdk/substrate/create-a-new-blockchain/break-down-the-node-architecture)
{% endcontent-ref %}

#### Sharded network design and block production / finalization mechanism

<figure><img src="https://2688244615-files.gitbook.io/~/files/v0/b/gitbook-x-prod.appspot.com/o/spaces%2FqpKohKlriBQm0I9cc9k5%2Fuploads%2FShfb8OfXpRTzuYr2VWZm%2Fimage.png?alt=media&amp;token=dfcb2071-4b41-4c94-94d1-4981e3811723" alt=""><figcaption></figcaption></figure>


# Running a local relaychain network

Below materials are primarily referenced from: <https://hackmd.io/@s_iGZLIITG6WjSgnFX0pcg/the-collator-setup-guide>

Before setting up a local relaychain network, walk through these materials:&#x20;

* [Understanding the sharded network design of Polkadot](/building-a-blockchain-with-polkadot-sdk/polkadot/additional-reads/understanding-the-sharded-network-design-of-polkadot)
* Prepare a local relaychain: <https://docs.substrate.io/tutorials/build-a-parachain/prepare-a-local-relay-chain/>
* Connect a local parachain: <https://docs.substrate.io/tutorials/build-a-parachain/connect-a-local-parachain/>

## Getting Started

Make sure they are compiled based on the same release version. If you want to connect the parachain to an already running Relay chain you can skip the Polkadot steps.

NOTE: Our polkadot version for the binaries is `v1.14.0`

* Build Polkadot:

```sh
git clone https://github.com/paritytech/polkadot
cd polkadot
cargo build --release
```

* Build Parachain:

```sh
git clone https://github.com/paritytech/polkadot-sdk-parachain-template
cd polkadot-sdk-parachain-template
cargo build --release
```

## Generate chainspec, runtime wasm, genesis state <a href="#generate-chainspec-runtime-wasm-genesis-state" id="generate-chainspec-runtime-wasm-genesis-state"></a>

### Chainspec <a href="#chainspec" id="chainspec"></a>

* Plain:

```sh
./target/release/parachain-template-node build-spec --disable-default-bootnode > parachain-chainspec.json
```

**Important**: edit the `parachain-chainspec.json` where necessary. For example; set the correct `para-id`, `protocolid` or `relay_chain`.

The `para-id` needs to be reserved on the Relay Chain. Check out the ["Connect a local Parachain"](https://docs.substrate.io/tutorials/build-a-parachain/connect-a-local-parachain/) tutorial and look for the step *"Reserve a unique identifier"*

* Raw:

```sh
./target/release/parachain-template-node build-spec --chain parachain-chainspec.json --disable-default-bootnode --raw > parachain-chainspec-raw.json
```

### Runtime wasm <a href="#runtime-wasm" id="runtime-wasm"></a>

Required to register the Parachain on the Relay Chain. The Relay Chain needs the runtime code to validate blocks.

```sh
./target/release/parachain-template-node export-genesis-wasm --chain parachain-chainspec-raw.json parachain-wasm
```

### Genesis state <a href="#genesis-state" id="genesis-state"></a>

Required to register the Parachain on the Relay Chain. Both the Relay Chain and the Parachain need to start from the same starting state.

```sh
./target/release/parachain-template-node export-genesis-state --chain parachain-chainspec-raw.json parachain-genesis-state
```


# Register & reserve a parachain

Every parachain must reserve a unique identifier—the `ParaID`—that enables it to connect to its specific relay chain. Each relay chain manages its own set of unique identifiers for the parachains that connect to it. The identifier is referred to as a `ParaID` because the same identifier can be used to identify a slot occupied by a [parachain](https://wiki.polkadot.network/docs/learn-parachains) or to identify a slot occupied by a [parathread](https://wiki.polkadot.network/docs/learn-parathreads).

You should note that you must have an account with sufficient funds to reserve a slot on a relay chain. You can determine the number of tokens a specific relay chain requires by checking the `ParaDeposit` configuration in the `paras_registrar` pallet for that relay chain. For example, Paseo Testnet requires 5 PASEO to reserve an identifier:

```rust
parameter_types! {
	pub const ParaDeposit: Balance = 5 * DOLLARS;
	pub const DataDepositPerByte: Balance = deposit(0, 1);
}

impl paras_registrar::Config for Runtime {
	type RuntimeEvent = RuntimeEvent;
	type RuntimeOrigin = RuntimeOrigin;
	type Currency = Balances;
	type OnSwap = (Crowdloan, Slots);
	type ParaDeposit = ParaDeposit;
	type DataDepositPerByte = DataDepositPerByte;
	type WeightInfo = weights::runtime_common_paras_registrar::WeightInfo<Runtime>;
}
```


# Launch the network & run a collator node

### Relay Chain <a href="#relay-chain" id="relay-chain"></a>

Either follow the tutorial ["Prepare a local Relay Chain"](https://docs.substrate.io/tutorials/build-a-parachain/prepare-a-local-relay-chain/), use [Zombienet](https://github.com/paritytech/zombienet) to setup a local environment or connect to Rococo.

**Important**: we need the same chainspec that is used to start the validators for the collator(s). In case of connecting to Rococo, we need the [Rococo chainspec](https://github.com/paritytech/polkadot/blob/master/node/service/chain-specs/rococo.json).

### Parachain <a href="#parachain" id="parachain"></a>

#### Register Parachain <a href="#register-parachain" id="register-parachain"></a>

If necessary, register the parachain to the Relay Chain with the `parachain-genesis-state` and the `parachain-wasm` files generated above. In addition, you need a `parachain manager account` and the `para-id`. Check out the ["Connect a local Parachain"](https://docs.substrate.io/tutorials/build-a-parachain/connect-a-local-parachain/) tutorial and look for the step *"Register with the local Relay Chain"*

#### Launch Collator <a href="#launch-collator" id="launch-collator"></a>

Before we launch a Collator for the Parachain, make sure that its database is purged from any previous attempts, as any leftover state can cause syncing issues. In other words, the genesis state of the collator won't match the genesis state that has been given to the Relay chain.

```
./target/release/parachain-node-template purge-chain --base-path /tmp/parachain/<collator> --chain parachain-chainspec-raw.json
```

Launch the collator:

```
./target/release/parachain-node-template --collator \
--name C1 \
--base-path /tmp/parachain/collator1 \
--chain parachain-chainspec-raw.json \
--force-authoring \
--rpc-port 10001 \
--ws-port 10002 \
--listen-addr /ip4/0.0.0.0/tcp/10003/ws \
-- \
--execution wasm \
--chain /{PATH_TO_RELAYCHAIN_CHAINSPEC} \
--port 10004 \
--ws-port 10005
```

1. Ensure the collator is peering with the relay chain (and the other collator(s) if present) by checking the collator output logs.
   * No peers with the Relay Chain: if you made changes to the relay chainspec, make sure `bootnodes` are provided. In addition, [NAT](https://github.com/paritytech/substrate/issues/2772) can also be a problem.
   * No peers with the Parachain: see **Important**.
2. No blocks being produced should be expected until the session key is added to the keystore - This is specific to a custom chain spec and would probably work if using the parachain-node-template default spec as it would probably just use alice/bob as collators.\
   `./target/release/parachain-node-template --help`:\
   ![](https://hackmd.io/_uploads/rJEeljysh.png)

**Important**:

* the `force-authoring` flag is only necessary when you have one collator (e.g. for testing).
* the `listen-addr` flag is necessary if you want other nodes to be able to connect to you to join the network. An additional `bootnodes` flag is necessary for this other collator (when the chainspec doesn't provide `bootnodes`). In addition, you need the `[parachain] local identity` of the collator you want to connect to (you can find this in the logs when you start your node).

An example of launching a second collator that you want to connect to the first collator shown above:

```
./target/release/parachain-node-template --collator \
--name C2 \
--base-path /tmp/parachain/collator2 \
--chain parachain-chainspec-raw.json \
--force-authoring \
--rpc-port 10006 \
--ws-port 10007 \
--listen-addr /ip4/0.0.0.0/tcp/10008/ws \
--bootnodes /ip4/127.0.0.1/tcp/10003/ws/p2p/{INSERT_COLLATOR_1_PARACHAIN_NODE_IDENTITY} \
-- \
--execution wasm \
--chain /{PATH_TO_RELAYCHAIN_CHAINSPEC} \
--port 10009 \
--ws-port 10010
```

\**The `force-authoring` can still be provided for the case where you want it to build blocks if it is the only collator in the network.*

Last, depending on the chain and the syncing method, the time it takes to be completely synchronized and build your first block can vary. The flag `--sync=warp` enables the node to make use of the [warp sync protocol](https://spec.polkadot.network/chap-sync#sect-sync-warp). This decreases the synchronization time significantly by only validating / applying full blocks at the end of the initial synchronization process.

## Session Keys <a href="#session-keys" id="session-keys"></a>

The session key needs to be set for a collator to start producing blocks. It is advised to use a different keypair than the collator keypair. This is to minimize exposure of the collator keypair.

### Generating keys <a href="#generating-keys" id="generating-keys"></a>

There are multiple ways to generate keys, such as:

* Polkadot JS extension or any other custodial
* [PolkaVault](https://wiki.polkadot.network/docs/polkadot-vault)
* [Subkey](https://docs.substrate.io/reference/command-line-tools/subkey/)

### Session-pallet <a href="#session-pallet" id="session-pallet"></a>

Session keys are set in [session-pallet](https://github.com/paritytech/substrate/tree/master/frame/session). Session keys can be added to [genesis state](https://github.com/paritytech/substrate/blob/cb450b626ac8e8848db76933e114e57e7cce3e8d/frame/session/src/lib.rs#L417-L421), otherwise [set\_keys](https://github.com/paritytech/substrate/blob/4d9d9116b5f65f4a7f3e70c1f4ab74d9fed60c0c/frame/session/src/lib.rs#L589) needs to be called by the collator.

In order to change your session keys you'd have to call `set_keys` with the new public key.

### Keystore <a href="#keystore" id="keystore"></a>

In order for a collator to be able to sign e.g. its produced block, the session keypair needs to be added to the `keystore`. The keystore is a file that provides a secure and encrypted storage solution for your private keys. It ensures that only authorized processes can access and use the private keys when needed.

1. Connect to your collator via Polkadot JS: <https://polkadot.js.org/apps/?rpc=ws%3A%2F%2F127.0.0.1%3A10002> (`ws-port` flag set to 10002)
2. Go to `Developer` and `RPC calls` and click **author**, **insertKey**.
3. Enter "aura" as the **keyType**
4. Enter the seed/mnemonic of the collator's session key as **suri**.
5. Enter he hex value of the public key of the collator's session key for **publicKey**.

The Collator's session keys are added to the keystore and should now be building blocks.

## Invulnerables & Candidates <a href="#invulnerables-amp-candidates" id="invulnerables-amp-candidates"></a>

As for cumulus' out-of-the-box implementation, the set of collators that are allowed to build blocks are coming from the pallet [`collator-selection`](https://github.com/paritytech/cumulus/blob/7d51356009b652aca3fa1dbba73b7c729003cd6c/pallets/collator-selection/src/lib.rs#L16-L60), more specifically the `invulnerables` and `candidates`.

If we want to add a new collator we either [add it to `invulnerables`](https://github.com/paritytech/cumulus/blob/7d51356009b652aca3fa1dbba73b7c729003cd6c/pallets/collator-selection/src/lib.rs#L490) through `root` or we can [register as a candidate](https://github.com/paritytech/cumulus/blob/7d51356009b652aca3fa1dbba73b7c729003cd6c/pallets/collator-selection/src/lib.rs#L424).

**Important**: `invulnerables` will always be chosen to build blocks. As for `candidates`, there is a [`desired_amount`](https://github.com/paritytech/cumulus/blob/7d51356009b652aca3fa1dbba73b7c729003cd6c/pallets/collator-selection/src/lib.rs#L205) that caps the amount of candidates that can be registered. In other words, if a collator wants to register as candidate but the `desired_amount` is met, the collator has to wait until a collator [`leave_intent`](https://github.com/paritytech/cumulus/blob/b3c98894621b317e07af5bd32f2b5a5e12bfc327/pallets/collator-selection/src/lib.rs#L469) or the desired\_amount [is increased](https://github.com/paritytech/cumulus/blob/b3c98894621b317e07af5bd32f2b5a5e12bfc327/pallets/collator-selection/src/lib.rs#L389).


# Agile Coretime

<figure><img src="https://2688244615-files.gitbook.io/~/files/v0/b/gitbook-x-prod.appspot.com/o/spaces%2FqpKohKlriBQm0I9cc9k5%2Fuploads%2FxnZZiMytHRpAS8u6GTVG%2FScreenshot%202024-11-25%20at%2012.41.22.png?alt=media&amp;token=ce7dbf09-d473-4e4c-85af-aed1b139003d" alt=""><figcaption></figcaption></figure>

<figure><img src="https://2688244615-files.gitbook.io/~/files/v0/b/gitbook-x-prod.appspot.com/o/spaces%2FqpKohKlriBQm0I9cc9k5%2Fuploads%2FQgpux9mT2rdi41jNkpfb%2FScreenshot%202024-11-25%20at%2012.42.01.png?alt=media&amp;token=f05a13b2-055e-4bb7-82a3-7891c2238e29" alt=""><figcaption></figcaption></figure>

In Polkadot 1.0, the only way for a parachain to be secured by Polkadot was to rent a lease through an [auction](https://wiki.polkadot.network/docs/learn/learn-auction), which guaranteed parachain block validation for up-to two years. This involved locking significant amount of DOT, leading to a high barrier of entry for small and medium scale blockchain projects. The parachains produced blocks at a regular interval of 12 seconds, irrespective of the network activity. This led to inefficient resource allocation and misplaced economic incentives while producing almost empty blocks under lighter traffic and being unable to accommodate heavier traffic when it exceeded block limits. Agile Coretime resolves all of these drawbacks.

The figure below shows the core usage for Polkadot 1.0, where the horizontal axis is time, and each row represents a core. Colors show different parachains, each using one core (i.e., one parachain, one core).

<figure><img src="https://2688244615-files.gitbook.io/~/files/v0/b/gitbook-x-prod.appspot.com/o/spaces%2FqpKohKlriBQm0I9cc9k5%2Fuploads%2FjgZIwSl9GpCHJU9mRCkp%2Fimage.png?alt=media&amp;token=eba0cb5f-7bf6-43b5-b18b-da58ca8d6720" alt=""><figcaption></figcaption></figure>

Agile Coretime allows for the purchase of [coretime](https://wiki.polkadot.network/docs/learn-agile-coretime#coretime) in “bulk” with an allocation for one month. Heavy duty parachains which need to author a block every 12 seconds (or every 6s through [Asynchronous Backing](https://wiki.polkadot.network/docs/learn-async-backing)), can seamlessly “renew” the [core](https://wiki.polkadot.network/docs/learn-agile-coretime#core) each month. Coretime renewal orders take precedence over new orders and provide protection against price fluctuations, allowing parachains to plan their project budget and costs more effectively.

The purchased coretime can also be split up and sold in parts, down to a single block per month, allowing for secondary markets to thrive and improve the allocation efficiency of coretime. Furthermore, Agile Coretime offers [on-demand coretime](https://wiki.polkadot.network/docs/learn-agile-coretime#on-demand-coretime) functionality that enables the authoring of a parachain block on-demand.

<figure><img src="https://2688244615-files.gitbook.io/~/files/v0/b/gitbook-x-prod.appspot.com/o/spaces%2FqpKohKlriBQm0I9cc9k5%2Fuploads%2FoXLUCM7rtEzmRwF3VFs6%2Fimage.png?alt=media&amp;token=f1c1afc2-a908-4263-a22c-3a73feb18dcf" alt=""><figcaption></figcaption></figure>


# Polkadot Hub

* About Plaza: <https://www.rob.tech/blog/plaza/>
* About Asset Hub: <https://wiki.polkadot.network/docs/learn-assets>

### [pallet\_revive](https://github.com/paritytech/polkadot-sdk/tree/master/substrate/frame/revive)[​](https://contracts.polkadot.io/architecture#pallet_revive) <a href="#pallet_revive" id="pallet_revive"></a>

This is the blockchain module which executes smart contracts. It adds a bunch of extrinsics and runtime APIs just as any other pallet. However, it also [adds logic](https://github.com/paritytech/polkadot-sdk/tree/master/substrate/frame/revive/src/evm) that allows the blockchain to process Ethereum-style transactions. Those special transactions are not submitted directly to the chain. Even though that would be theoretically possible.

Instead, users (wallets, Dapps, ...) connect to a [proxy server](https://github.com/paritytech/polkadot-sdk/tree/master/substrate/frame/revive/rpc) deployed alongside the blockchain node. This proxy emulates the Ethereum Json RPC, meaning it exposes the Ethereum JSON RPC interface as a server and connects to the node as a network client. It repackages the Ethereum transactions into a [special dispatchable](https://github.com/paritytech/polkadot-sdk/blob/2700dbf2dda8b7f593447c939e1a26dacdb8ce45/substrate/frame/revive/src/lib.rs#L759-L784) while leaving the payload untouched. It is up to the logic mentioned above to decode the Ethereum transaction and transform it into something that `pallet-revive` can understand. By submitting the Ethereum transaction's payload verbatim to the block we make it easy to adapt tooling (e.g. block explorers) which don't need to deal with a different transaction format.

The choice of using a standalone proxy is intentional: Adding new endpoints to the node binary would require alternative clients to implement them as well. This is why we chose this approach that requires zero changes to the client.

### [PolkaVM](https://github.com/paritytech/polkavm)[​](https://contracts.polkadot.io/architecture#polkavm) <a href="#polkavm" id="polkavm"></a>

This is the most obvious change we made versus competing technologies. Instead of using an EVM to execute contracts we use a new custom virtual machine. Currently, we include a PolkaVM interpreter within the runtime itself. A later update will deliver a full PolkaVM JIT running inside the client. Please note that we will still keep the interpreter available so that we can use the most appropriate backend for each workload. For example, for contract invocations that just execute very little code the interpreter will still be faster as it can start executing code right away (lazy interpretation).

The two fundamental differences to the EVM are:

#### Register Machine[​](https://contracts.polkadot.io/architecture#register-machine) <a href="#register-machine" id="register-machine"></a>

EVM is a stack machine. This means that arguments to functions are passed on an infinite stack. PolkaVM is based on RISC-V which is a register machine. This means it passes arguments in a finite set of registers. The main benefit of this is that it makes the translation step to the underlying hardware much more efficient as those are all register machines. We chose the number of registers carefully so that they are smaller than in the infamously register-starved x86-64 instruction set. Allowing us to reduce the NP-hard register allocation problem to a simple 1to1 mapping is the secret ingredient to PolkaVM's fast compilation times.

#### Reduced Word Size[​](https://contracts.polkadot.io/architecture#reduced-word-size) <a href="#reduced-word-size" id="reduced-word-size"></a>

EVM uses a word size of 256bit. Which means that **every** arithmetic operation has to be performed on those big numbers. This makes any meaningful number crunching really slow as it has to be translated to a lot of native instructions. PolkaVM uses a word size of 64bit which is natively supported by the underlying hardware. That said, when translating Solidity contracts via YUL (#Revive) we will still end up with 256bit arithmetic as YUL is too low-level to automatically convert the integer types. However, it is perfectly possible to write contracts in a different language and call that seamlessly from Solidity. We imagine a system where business logic is written in Solidity but the underlying architecture in faster languages, akin to Python where most of the heavy lifting is done by C modules.

### [Revive](https://github.com/paritytech/revive)[​](https://contracts.polkadot.io/architecture#revive) <a href="#revive" id="revive"></a>

In order to run Solidity on PolkaVM we need to compile it to RISC-V. For that we need a compiler. It works by using the original `solc` compiler and then recompiling its intermediate representation (YUL) output to RISC-V. This has the benefit of being a much smaller task than implementing a full Solidity compiler. We support all quirks and oddities of Solidity and all its different versions by choosing this approach.

### Remix[​](https://contracts.polkadot.io/architecture#remix) <a href="#remix" id="remix"></a>

We maintain a fork of REMIX. The main change compared to the original version is that we needed to change the compiler so we changed REMIX to use a backend for compilation instead of an in-browser compiler. This was necessary as our LLVM-based revive is too heavyweight for the browser.

* [REMIX fork](https://github.com/paritytech/revive-remix)
* [Compiler backend](https://github.com/paritytech/revive-remix-backend)
* [Hosted version](https://remix.polkadot.io/)<br>


# Introduction


# Introduction to PolkaVM

## Overview

### PolkaVM

`PolkaVM`, short for `Polka Virtual Machine`, is a decentralized virtual machine environment running on the Polkadot blockchain network. `PolkaVM` enables the execution of smart contracts, which are programs that automatically execute transactions or specific actions based on pre-coded conditions. Smart contracts are written in programming languages ​​such as Solidity, then compiled into `bytecode` that `KLVM` can understand and execute. `PolkaVM` is compatible with Ethereum's `EVM`, so it fully supports current development tools, `opcode`, and source code.

### What is smart contract?

A `smart contract` is a type of computer program designed to automatically execute, control, or confirm events and actions according to pre-programmed terms. They exist and operate on `PolkaVM`, ensuring high transparency and security as they cannot be modified once deployed. `Smart contracts` help automate processes, reduce the need for intermediaries and minimize the risk of fraud or errors. They are versatile and can be used in a variety of fields, from finance and insurance to supply chain management and real estate. The development of `smart contracts` is ushering in a new era in the way we interact and conduct digital transactions, bringing greater efficiency, transparency and autonomy to users.

### Transaction and how to sign a Transaction

In the Asset Hub network, a "transaction" or transaction is an action performed by a user to transfer DOT (Polakdot native token) or Asset Hub based tokens from one address to another, or to interact with contracts. smart contract. Each transaction includes information such as source address, destination address, amount of money transferred, gas (transaction fee), and optional data if the transaction interacts with a smart contract.

When making transactions on Asset Hub, signing the transaction using a crypto wallet like MetaMask is an important step to ensure safety and security. Specifically, this process takes place as follows:

1. Create Transaction: User enters necessary information for the transaction such as receiving address, amount of `DOT` or tokens to transfer, and gas. In MetaMask, for example, users can adjust gas levels so transactions are processed faster.
2. Transaction Signing: Once the transaction information is entered, the wallet generates a digital transaction signed with the user's private key. Signing this transaction proves that the user has the right to use the address from which the transaction was sent without revealing their private key.
3. Sending Transaction: The signed transaction is then sent to the Asset Hub network via a wallet such as MetaMask. The network will confirm the transaction and execute it, transfer funds or interact with the smart contract as requested.
4. Transaction Confirmation: Finally, the transaction will be confirmed by the network, and information about it will be recorded on the blockchain. Users can track the status of transactions through online tools such as Subscan.

This process not only helps ensure transactions are carried out securely, but also helps prevent tampering or unauthorized alteration of transactions, thanks to the transparency and immutability of the blockchain.


# Getting started with Solidity development

## Set up overview

### Online IDE

* [Remix IDE](https://remix.ethereum.org/#lang=en\&optimize=false\&runs=200\&evmVersion=null)

### Wallet

* Download Metamask Wallet at [https://Metamask.io/](https://metamask.io/)
* Create wallet
* Add network
  * Network name: `Asset-Hub Westend Testnet`
  * RPC URL URL: <https://westend-asset-hub-eth-rpc.polkadot.io>
  * Chain ID: `420420421`
  * Currency Symbol: `WND`
  * Block Explorer URL: <https://assethub-westend.subscan.io>

### Testnet WND

* Go to <https://faucet.polkadot.io/westend?parachain=1000>
* Enter your wallet address to receive testnet `WND`


# Solidity File Structure

## Structure of a Solidity file

### SPDX License Identifier

All solidity contracts should have License declaration in the first line.

```solidity
// SPDX-License-Identifier: MIT
```

List of licenses from SPDX repository: <https://spdx.org/licenses/>

### Pragmas

`pragma` is the keyword used to declare the compiler version of Solidity. `pragma` only applies to the current local file so you must add `pragma` to all files in the project directory.

```solidity
// SPDX-License-Identifier: MIT
pragma solidity 0.8.20;
```

You can use the `^` sign or the comparison operators `<`, `<=`, `>`, `>=` in conjunction with the compiler declaration.

```solidity
// SPDX-License-Identifier: MIT
pragma solidity ^0.8.20; // use compiler version 0.8.20 and above
```

```solidity
// SPDX-License-Identifier: MIT
pragma solidity >=0.4.22 <0.9.0; // use compiler version bigger or equal to 0.4.22 and less than 0.9.0
```

### Import file from other sources

#### Import the whole file

```solidity
import "FileName"
```

#### Import all and assign alias

```solidity
import * as symbolName from "FileName";
```

#### Name import

`Name import` means you will specify the name of the import object from another file. The reason you should use this option is that it makes your code clearer.

```solidity
import {ContractOne as alias, ContractTwo} from "FileName";
```

### Comment

To comment, you can use `//` and `/* */`

```solidity
// comment for 1 line.

/*
Comment for
multiple lines
*/
```

There is also [NatSpec](https://docs.soliditylang.org/en/v0.8.24/natspec-format.html#natspec) comment with `///` or `/** **/`

```solidity
// SPDX-License-Identifier: GPL-3.0
pragma solidity >=0.4.16 <0.9.0;

/// @author The Project Team
/// @title A simple storage example
contract SimpleStorage {
    uint storedData;

    /// Store `x`.
    /// @param x the new value to store
    /// @dev stores the number in the state variable `storedData`
    function set(uint x) public {
        storedData = x;
    }

    /// Return the stored value.
    /// @dev retrieves the value of the state variable `storedData`
    /// @return the stored value
    function get() public view returns (uint) {
        return storedData;
    }
}
```


# Contract Structure

## Contract structure

### State and local variables

`State variables` are variables declared at the beginning of the contract, outside the scope of `local variables` declared in `function`.

```solidity
// SPDX-License-Identifier: GPL-3.0
pragma solidity >=0.4.0 <0.9.0;

contract SimpleStorage {
    uint public storedData; // State variable
    // ...

    function updateStoredData(uint newData) public {
        uint formattedData = newData * 2; // formattedData is local variable
        storedData = formattedData;
    }

    function getFormattedData() public view returns (uint) {
        return formattedData; // failed can't compile because formattedData is local scope to the other function
    }

    function getStoredData() public view returns (uint) {
        return storedData; // can compile because global variable
    }
}
```

### Functions

`Function` are functions declared to perform calculations, change the value of variables, etc. A sample `function` is given below.

```solidity
// SPDX-License-Identifier: GPL-3.0
pragma solidity >=0.7.1 <0.9.0;

contract SimpleAuction {
    function bid() public payable { // Function
        // ...
    }
}

// Helper function defined outside of a contract
function helper(uint x) pure returns (uint) {
    return x * 2;
}
```

### Function modifiers

`Function modifier` are declarations for `function` to create conditions for running actions of that `function`.

```solidity
// SPDX-License-Identifier: GPL-3.0
pragma solidity >=0.4.22 <0.9.0;

contract Purchase {
    address public seller;

    modifier onlySeller() { // Modifier
        require(
            msg.sender == seller,
            "Only seller can call this."
        );
        _;
    }

    function abort() public view onlySeller { // Modifier usage
        // ...
    }
}
```

### Events

`event` is a feature for recording smart contract activities. `event` is often used in building interactive UI with smart contracts.

```solidity
// SPDX-License-Identifier: GPL-3.0
pragma solidity ^0.8.22;

event HighestBidIncreased(address bidder, uint amount); // Event

contract SimpleAuction {
    function bid() public payable {
        // ...
        emit HighestBidIncreased(msg.sender, msg.value); // Triggering event
    }
}
```

### Errors

`error` is used to inform the user why the action failed, and `error` has a lower `gas` cost than returning `string`.

```solidity
// SPDX-License-Identifier: GPL-3.0
pragma solidity ^0.8.4;

/// Not enough funds for transfer. Requested `requested`,
/// but only `available` available.
error NotEnoughFunds(uint requested, uint available);

contract Token {
    mapping(address => uint) balances;
    function transfer(address to, uint amount) public {
        uint balance = balances[msg.sender];
        if (balance < amount)
            revert NotEnoughFunds(amount, balance);
        balances[msg.sender] -= amount;
        balances[to] += amount;
        // ...
    }
}
```

### Struct types

`struct` is used to declare a `type` of `object`.

```solidity
// SPDX-License-Identifier: GPL-3.0
pragma solidity >=0.4.0 <0.9.0;

contract Ballot {
    struct Voter { // Struct
        uint weight;
        bool voted;
        address delegate;
        uint vote;
    }
}
```

### Enum types

`enum` is used to declare a `type` whose values ​​are `constant`.

```solidity
// SPDX-License-Identifier: GPL-3.0
pragma solidity >=0.4.0 <0.9.0;

contract Purchase {
    enum State { Created, Locked, Inactive } // Enum
}
```


# Basic Solidity


# Value types

### INT / UINT

`uint` is short for `unsigned integer`, and you can choose the size from `uint8` to `uint256`

* `uint8` starts from `0` to `2 ** 8 - 1`
* `uint16` starts from `0` to `2 ** 16 - 1`\
  ...
* `uint256` starts from `0` to `2 ** 256 - 1`

```solidity
uint8 public u8 = 1;
uint256 public u256 = 456;
uint public u = 123; // uint is short hand for uint256
```

`int` is short for `integer`, and you can choose the size from `int8` to `int256`

* `int8` starts from `-2 ** 7` to `2 ** 7 - 1`
* `int16` starts from `-2 ** 15` to `2 ** 15 - 1` ...
* `int128` starts from `-2 ** 127` to `2 ** 127 - 1`
* `int256` starts from `-2 ** 255` to `2 ** 255 - 1`

```solidity
int8 public i8 = -1;
int256 public i256 = 456;
int public i = -123; // int is short hand for int256
```

#### int and uint operators:

* Comparisons: <=, <, ==, !=, >=, > (returns `bool`)
* Bit operations: &, |, ^ (bitwise exclusive hoặc), \~ (bitwise negation)
* Shifts: << (left shift), >> (right shift)
* Addition, Subtraction and Multiplication: `+`, `-`, `negative -` (as in `signed integer`), `*`, `/`, `%` (modulo), `**` (exponentiation)

For a type `integer` variable X, you can use `type(X).min` and `type(X).max` to access smallest and biggest value respectively for that type.

```solidity
// minimum and maximum of int type: 
int public minInt = type(int).min;
int public maxInt = type(int).max;

// minimum and maximum of uint type:
uint public minUint = type(uint).min;
uint public maxUint = type(uint).max;
```

### BOOL

`bool` means `Boolean` and has 2 possible values which are `true` and `false`

```solidity
bool public trueVar = true;
bool public falseVar = false;
```

#### Operators:

* `!` (logical negation)
* `&&` (logical conjunction, “and”)
* `||` (logical disjunction, “or”)
* `==` (equality)
* `!=` (inequality)

The operators `||` and `&&` apply the common short-circuiting rules. This means that in the expression `f(x) || g(y)`, if `f(x)` evaluates to `true`, `g(y)` will not be evaluated even if it may have side-effects.

### ADDRESS

* `address` is a special data type in Solidity that allows storing 20 bytes (size) of the address of an EVM account
* `address payable` similar to `address` but adds 2 more methods `transfer` and `send`

```solidity
address public exampleAddress = 0xCA35b7d915458EF540aDe6068dFe2F44E8fa733c;
address payable public examplePayableAddress = payable(0xCA35b7d915458EF540aDe6068dFe2F44E8fa733c);

function getAddressBalance() public view returns (uint) {
    // Returns the balance of the exampleAddress
    return exampleAddress.balance;
}

function sendViaTransfer() public payable {
    // This function is no longer recommended for sending Ether.
    examplePayableAddress.transfer(msg.value);
}

function sendViaSend() public payable {
    // Send returns a boolean value indicating success or failure.
    // This function is not recommended for sending Ether.
    bool sent = examplePayableAddress.send(msg.value);
    require(sent, "Failed to send Ether");
}

function sendViaCall() public payable {
    // Send Ether to the wallet
    (bool sent, bytes memory data) = examplePayableAddress.call{value: msg.value}("");
    require(sent, "Failed to send Ether");
}
```

### BYTES

In Solidity, the byte data type represents a sequence of bytes. Solidity has two types of bytes:

* Fixed-size byte arrays
* Dynamic-size byte arrays

The bytes keyword in Solidity represents a dynamic array of bytes. Essentially, it is a shorthand for `byte[]`.

```solidity
bytes1 a = 0xb5; //  [10110101]
bytes1 b = 0x56; //  [01010110]
bytes c = "abc"; //  [01100001, 01100010, 01100011]
```

### Default values

Declared variables without value assignment will have its default values.

```solidity
bool public defaultBool; // false
uint public defaultUint; // 0
int public defaultInt; // 0
address public defaultAddr; // 0x0000000000000000000000000000000000000000
bytes1 public defaultByte; // 0x00
```

### CONTRACT

`contract` is used to declare a contract in Solidity.

```solidity
contract HelloWorld {}
```

`contract` can also inherit from another contract using the keyword `is`

```solidity
contract Mercedes is Car {}
```

### ENUM

`Enums` are one way to create a user-defined type in Solidity. They are explicitly convertible to and from all integer types but implicit conversion is not allowed. The explicit conversion from integer checks at runtime that the value lies inside the range of the enum and causes a `Panic error` otherwise. `Enums` require at least one member, and its default value when declared is the first member. Enums cannot have more than 256 members.

The data representation is the same as for `enums` in C: The options are represented by subsequent unsigned integer values starting from 0.

Using `type(NameOfEnum).min` and `type(NameOfEnum).max` you can get the smallest and respectively largest value of the given enum.

```solidity
// SPDX-License-Identifier: MIT
pragma solidity ^0.8.20;

contract Enum {
    // Enum representing shipping status
    enum Status {
        Pending,
        Shipped,
        Accepted,
        Rejected,
        Canceled
    }

    // Default value is the first element listed in
    // definition of the type, in this case "Pending"
    Status public status;

    // Returns uint
    // Pending  - 0
    // Shipped  - 1
    // Accepted - 2
    // Rejected - 3
    // Canceled - 4
    function get() public view returns (Status) {
        return status;
    }

    // Update status by passing uint into input
    function set(Status _status) public {
        status = _status;
    }

    // You can update to a specific enum like this
    function cancel() public {
        status = Status.Canceled;
    }

    // delete resets the enum to its first value, 0
    function reset() public {
        delete status;
    }
}
```

### TYPE

A user-defined value type allows creating a zero cost abstraction over an elementary value type. This is similar to an alias, but with stricter type requirements.

A user-defined value type is defined using `type C is V`, where `C` is the name of the newly introduced type and `V` has to be a built-in value type (the “underlying type”)

```solidity
// SPDX-License-Identifier: GPL-3.0
pragma solidity ^0.8.8;

// Represent a 18 decimal, 256 bit wide fixed point type using a user-defined value type.
type UFixed256x18 is uint256;
```

### FUNCTION

`function` keyword is used to declare a function in Solidity.

We can declare a `function` like below:

```solidity
contract Counter {
    uint public count;

    // Function to view count variable
    function get() public view returns (uint) {
        return count;
    }
}
```


# Reference Types

### Data storage locations

Variables are declared with the words `storage`, `memory` or `calldata` to specify the location to save the data.

* `storage` - variable is state variable (stored on blockchain)
* `memory` - Variables are in memory and only exist while the `function` is running
* `calldata` - A special data store containing the data passed to the function

```solidity
// SPDX-License-Identifier: MIT
pragma solidity ^0.8.26;

contract DataLocations {
    uint256[] public arr; // in storage

    // You can return memory variables
    function g(uint256[] memory _arr) public returns (uint256[] memory) {
        // do something with memory array
    }

    function h(uint256[] calldata _arr) external {
        // do something with calldata array
    }

}
```

### Array

`Array` is a combination of value elements in the same format, similar to `list` in python and `array` in `Javascript`.

```solidity
// SPDX-License-Identifier: MIT
pragma solidity ^0.8.20;

contract Array {
    // Several ways to initialize an array
    uint[] public arr;
    uint[] public arr2 = [1, 2, 3];
    // Fixed sized array, all elements initialize to 0
    uint[10] public myFixedSizeArr;

    function get(uint i) public view returns (uint) {
        return arr[i];
    }

    // Solidity can return the entire array.
    // But this function should be avoided for
    // arrays that can grow indefinitely in length.
    function getArr() public view returns (uint[] memory) {
        return arr;
    }

    function push(uint i) public {
        // Append to array
        // This will increase the array length by 1.
        arr.push(i);
    }

    function pop() public {
        // Remove last element from array
        // This will decrease the array length by 1
        arr.pop();
    }

    function getLength() public view returns (uint) {
        return arr.length;
    }

    function remove(uint index) public {
        // Delete does not change the array length.
        // It resets the value at index to it's default value,
        // in this case 0
        delete arr[index];
    }

    function examples() external {
        // create array in memory, only fixed size can be created
        uint[] memory a = new uint[](5);
    }
}
```

### Struct

`Struct` is a data format that programmers declare to gather many variables of different formats under one name for easy use in `contract`.

```solidity
// SPDX-License-Identifier: MIT
pragma solidity ^0.8.20;

contract Todos {
    struct Todo {
        string text;
        bool completed;
    }

    // An array of 'Todo' structs
    Todo[] public todos;

    function create(string calldata _text) public {
        // 3 ways to initialize a struct
        // - calling it like a function
        todos.push(Todo(_text, false));

        // key value mapping
        todos.push(Todo({text: _text, completed: false}));

        // initialize an empty struct and then update it
        Todo memory todo;
        todo.text = _text;
        // todo.completed initialized to false

        todos.push(todo);
    }

    // Solidity automatically created a getter for 'todos' so
    // you don't actually need this function.
    function get(uint _index) public view returns (string memory text, bool completed) {
        Todo storage todo = todos[_index];
        return (todo.text, todo.completed);
    }

    // update text
    function updateText(uint _index, string calldata _text) public {
        Todo storage todo = todos[_index];
        todo.text = _text;
    }

    // update completed
    function toggleCompleted(uint _index) public {
        Todo storage todo = todos[_index];
        todo.completed = !todo.completed;
    }
}
```


# Mapping Types

### Mapping

`mapping` can be used to create a `hashmap` (similar to `dict` in `python`) between 1 `type` to another `type`.

#### Note

When you create a `mapping`, all `keys` exist at the same time. That means:

For example, you create `mapping(address => uint256) addressToValue;`. If you haven't set any `key` and `value` then all `address` that you input will return the default value of `uint256` which is 0.

```solidity
// SPDX-License-Identifier: MIT
pragma solidity ^0.8.20;

contract Mapping {
    // Mapping from address to uint
    mapping(address => uint) public myMap;

    function get(address _addr) public view returns (uint) {
        // Mapping always returns a value.
        // If the value was never set, it will return the default value.
        return myMap[_addr];
    }

    function set(address _addr, uint _i) public {
        // Update the value at this address
        myMap[_addr] = _i;
    }

    function remove(address _addr) public {
        // Reset the value to the default value.
        delete myMap[_addr];
    }
}

contract NestedMapping {
    // Nested mapping (mapping from address to another mapping)
    mapping(address => mapping(uint => bool)) public nested;

    function get(address _addr1, uint _i) public view returns (bool) {
        // You can get values from a nested mapping
        // even when it is not initialized
        return nested[_addr1][_i];
    }

    function set(address _addr1, uint _i, bool _boo) public {
        nested[_addr1][_i] = _boo;
    }

    function remove(address _addr1, uint _i) public {
        delete nested[_addr1][_i];
    }
}
```


# Simple Storage

```solidity
// SPDX-License-Identifier: MIT

pragma solidity ^0.8.20;

contract SimpleStorage {

    // Declare a variable to store the name of the maintainer
    string public maintainerName = "zxstim";
    // Declare the version of the contract
    uint8 public version = 1;
    // Declare an address to receive donation
    address public donationAddress = 0xe3d25540BA6CED36a0ED5ce899b99B5963f43d3F;

    // Declare a Person type to store information of a person
    struct Person {
        string name; // name    
        uint8 age; // age
        bool overEighteen; // Over eighteen?
        address uuid; // UUID
        uint256 assetValue; // asset value
        int256 debtValue; // debt value
    }

    Person[] private listOfPeople; // this syntax means creating an array to store Person named listOfPeople
    
    mapping(address => Person) uuidToPerson; // this syntax means creating a mapping from address to Person named uuidToPerson

    //  this function will store the information of a new person with name, age, overEighteen, assetValue, debtValue
    function storePerson(string memory _name, uint8 _age, bool _overEighteen, uint256 _assetValue, int256 _debtValue) public returns (Person memory person) {
        _assetValue *= 1e18; // Convert asset value to wei unit
        _debtValue *= 1e18; // Convert debt value to wei unit
        // Add information of the new person to the listOfPeople array
        listOfPeople.push(Person({name: _name, age: _age, overEighteen: _overEighteen, uuid: msg.sender, assetValue: _assetValue, debtValue: _debtValue}));
        // Add information of the new person to the uuidToPerson mapping
        uuidToPerson[msg.sender] = Person({name: _name, age: _age, overEighteen: _overEighteen, uuid: msg.sender, assetValue: _assetValue, debtValue: _debtValue});
        return Person({name: _name, age: _age, overEighteen: _overEighteen, uuid: msg.sender, assetValue: _assetValue, debtValue: _debtValue});
    }

    // this function will retrieve the information of a person based on the address
    function retrievePerson(address _address) public view returns (Person memory person) {
        return uuidToPerson[_address];
    }
}
```


# Advanced Solidity


# Units

### Common units

* `wei` is the smallest subdenomination of Ether (1 `wei` == 1)
* `gwei` is the commonly used subdenomination to describe gas price (1 `gwei` == 1e9)
* `ether` unit (1 `ether` == 1e18)

#### Note

In Solidity, we will use integers for calculations and the language does not support the `float` type. The float representation issue causes rounding errors (`rounding`) that create logical holes for attack.

### Time units

* 1 == 1 `seconds`
* 1 `minutes` == 60 `seconds`
* 1 `hours` == 60 `minutes`
* 1 `days` == 24 `hours`
* 1 `weeks` == 7 `days`

**Example**

```solidity
function f(uint start, uint daysAfter) public {
    if (block.timestamp >= start + daysAfter * 1 days) {
        // ...
    }
}
```


# Global Variables

### Block and Transaction Properties

* `blockhash(uint blockNumber) returns (bytes32)`: hash of the given block when `blocknumber` is one of the 256 most recent blocks; otherwise returns zero
* `block.basefee (uint)`: current block’s base fee
* `block.chainid (uint)`: current chain id
* `block.coinbase (address payable)`: current block miner’s address
* `block.gaslimit (uint)`: current block gaslimit
* `block.number (uint)`: current block number
* `block.timestamp (uint)`: current block timestamp as seconds since unix epoch
* `gasleft() returns (uint256)`: remaining gas
* `msg.data (bytes calldata)`: complete calldata
* `msg.sender (address)`: sender of the message (current call)
* `msg.sig (bytes4)`: first four bytes of the calldata (i.e. function identifier)
* `msg.value (uint)`: number of wei sent with the message
* `tx.gasprice (uint)`: gas price of the transaction
* `tx.origin (address)`: sender of the transaction (full call chain)

### Error handling

* `assert(bool condition)`: causes a Panic error and thus state change reversion if the condition is not met - to be used for internal errors.
* `require(bool condition)`: reverts if the condition is not met - to be used for errors in inputs or external components.
* `require(bool condition, string memory message)`: reverts if the condition is not met - to be used for errors in inputs or external components. Also provides an error message.
* `revert()`: abort execution and revert state changes
* `revert(string memory reason)`: abort execution and revert state changes, providing an explanatory string

### Members of Address Types

* `<address>.balance (uint256)`: balance of the Address in Wei
* `<address>.code (bytes memory)`: code at the Address (can be empty)
* `<address>.codehash (bytes32)`: the codehash of the Address
* `<address payable>.transfer(uint256 amount)`: send given amount of Wei to Address, reverts on failure, forwards 2300 gas stipend, not adjustable
* `<address payable>.send(uint256 amount) returns (bool)`: send given amount of Wei to Address, returns false on failure, forwards 2300 gas stipend, not adjustable
* `<address>.call(bytes memory) returns (bool, bytes memory)`: issue low-level CALL with the given payload, returns success condition and return data, forwards all available gas, adjustable
* `<address>.delegatecall(bytes memory) returns (bool, bytes memory)`: issue low-level DELEGATECALL with the given payload, returns success condition and return data, forwards all available gas, adjustable
* `<address>.staticcall(bytes memory) returns (bool, bytes memory)`: issue low-level STATICCALL with the given payload, returns success condition and return data, forwards all available gas, adjustable

### Contract-related keywords

* `this`: The current contract, explicitly convertible to Address
* `super`: A contract one level higher in the inheritance hierarchy
* `selfdestruct(address payable recipient)`: Destroy the current contract, sending its funds to the given Address and end execution. Note that selfdestruct has some peculiarities inherited from the EVM:
  * the receiving contract’s receive function is not executed.
  * the contract is only really destroyed at the end of the transaction and revert s might “undo” the destruction.


# Expression and Control Structures

### Supported keywords

There is: `if`, `else`, `while`, `do`, `for`, `break`, `continue`, `return`, `try`/`catch` with the usual semantics known from C or JavaScript.

### Function Calls

We can call `function` of 1 `contract` from another `contract`. We have an example below with 2 contracts `Caller` and `Callee`.

```solidity
// SPDX-License-Identifier: MIT
pragma solidity ^0.8.20;

contract Callee {
    uint public x;
    uint public value;

    function setX(uint _x) public returns (uint) {
        x = _x;
        return x;
    }

    function setXandSendEther(uint _x) public payable returns (uint, uint) {
        x = _x;
        value = msg.value;

        return (x, value);
    }
}

contract Caller {
    function setX(Callee _callee, uint _x) public returns (uint) {
        uint x = _callee.setX(_x);
        return x;
    }

    function setXFromAddress(address _addr, uint _x) public {
        Callee callee = Callee(_addr);
        callee.setX(_x);
    }

    function setXandSendEther(Callee _callee, uint _x) public payable returns (uint, uint) {
        (uint x, uint value) = _callee.setXandSendEther{value: msg.value}(_x);
        return (x, value);
    }
}
```

### Create new contract with keyword `new`

We can use keyword `new` to create a new contract. `AdvancedStorage.sol` example will explain this in more details.


# Advanced Storage

```solidity
// SPDX-License-Identifier: MIT

pragma solidity ^0.8.20;

contract AdvancedStorage {
    // Declare the address of a vault manager
    address public vaultManager;

    // Declare an error type for unauthorized access
    error OwnableUnauthorizedAccount(address account);

    // Constructor is a function that runs when the contract is initialized
    constructor() {
        // Assign the address of the deployer to the vault manager variable
        vaultManager = msg.sender;
    }

    // Declare the InvestmentVault Struct data type
    struct InvestmentVault {
        uint256 investmentDuration; // investment duration
        int256 returnOnInvestment; // return on investment
        bool initialized; // status of vault initiatialization
        address identityCard; // identity card of the customer in this case the address
    }
    // Declare a variable with the InvestmentVault type
    InvestmentVault private investmentVault;

    // This function initializes the investment vault
    function setInitialInvestmentVault(uint256 daysAfter, int256 _returnOnInvestment, address _vaultOwner) public {
        // We check if the initiator is the vaultManager
        if (msg.sender != vaultManager) {
            // This reverts all actions and reverts the transaction
            revert OwnableUnauthorizedAccount(msg.sender);
        }
        // Declare the investment duration
        uint256 _investmentDuration = block.timestamp + daysAfter * 1 days;

        // Create a new identity card for the customer
        CustomerIdentityCard customerIdentityCard = new CustomerIdentityCard(_vaultOwner);
        // Assign the address of the vault owner/customer to the mapping with the vault information
        investmentVault = InvestmentVault({investmentDuration: _investmentDuration, returnOnInvestment: _returnOnInvestment, initialized: true, identityCard: address(customerIdentityCard)});
    }

    // Function to change the return on investment
    function editReturnOnInvestment(int256 _newReturnOnInvestment) public {
        // require keyword works similarly to if and revert above
        require (msg.sender == vaultManager, "Unauthorized Manager");
        // Change the value of the interest rate
        investmentVault.returnOnInvestment = _newReturnOnInvestment;
    }

    // Function to return investmentVault information
    function retrieveInvestmentVault() public view returns (InvestmentVault memory _investmentVault) {
        return investmentVault;
    }

    // Function to return the address of the IdentityCard
    function retrieveCustomerInformation() public view returns (address) {
        return CustomerIdentityCard(investmentVault.identityCard).customer();
    }
}

// Contract that stores the address of the vault owner
contract CustomerIdentityCard {
    //  declares a variable to store the address of the customer
    address public customer;

    // initialize the contract and assign the address of the customer
    constructor(address _customer) {
        customer = _customer;
    }
}

```


# Contract Tests

Thorough testing of Solidity files plays an important role in ensuring the quality, reliability, and security of your blockchain project.

Here are some main reasons:

* Error detection: Testing helps you identify and fix errors in your Solidity code. Code errors can lead to unwanted behavior and even loss of assets. Testing helps you detect these errors early and fix them before they cause serious problems.
* Ensure security: Testing helps you identify security vulnerabilities in your Solidity code. Security vulnerabilities can leave your project vulnerable to hackers. Testing helps you identify these vulnerabilities and take measures to patch them.
* Increase reliability: Testing helps you increase the reliability of your blockchain project. When users know that your project has been thoroughly tested, they will have more trust in the project and be more likely to use it.
* Save time and money: Testing helps you save time and money in the long term. Fixing errors sooner will help you avoid more serious and costly problems later.

There are many different testing methods that can be used to test Solidity files. Some popular methods include:

1. Unit test: is a method of testing each individual unit of code.
2. Integration test: is a method of testing how different units of code work together.
3. Forked test: is a method of testing code in an environment that simulates the real environment.
4. Staging test: is a method of testing code in a real environment but not in prod. Choosing the right testing method will depend on the specific needs of your project.

Here are some tips for effectively testing Solidity files:

* Write test code that is easy to understand and maintain.
* Use many different testing methods.
* Automate testing.
* Consider using specialized testing tools.

### How to test?

Remix, or Hardhat, or Foundry have their own options for testing smart contracts. You can refer to the in-depth docs below:

* [Remix test](https://remix-ide.readthedocs.io/en/latest/unittesting.html)
* [Hardhat test](https://hardhat.org/tutorial/testing-contracts)
* [Foundry forge test](https://book.getfoundry.sh/forge/writing-tests)


# Contracts

## More information about Contract in Solidity

### constructor

Constructor is a function that runs immediately when the smart contract is initialized

```solidity
// SPDX-License-Identifier: MIT
pragma solidity ^0.8.24;

// Base contract X
contract X {
    string public name;

    constructor(string memory _name) {
        name = _name;
    }
}
```

### State variable visibility

* `public` - Public variables are similar to `internal` variables (allowing the current contract and inherited contracts to access) but will automatically create a `getter function` so that external contracts can also access it.
* `internal` - The variable can only be accessed by the current contract and inherited contracts. This is also the default visibility for state variable.
* `private` - The variable can only be accessed by the current contract.

**Note**: The `internal` and `private` variables only restrict access to other `contracts`. The value of the variable remains visible to everyone.

### Function visibility

* `external` - `function` that can only be called from outside.
* `public` - `function` can both be called by another `function` in `contract`, and can also be called from outside.
* `internal` - `function` can only be called by an existing `contract` or an inherited `contract`.
* `private` - `function` can only be called by the current `contract`.

### Getter function

`function` is used to call the `public` variable that the compiler automatically creates. Also used to refer to the concept of `function` used to query variables to view.

```solidity
// SPDX-License-Identifier: GPL-3.0
pragma solidity >=0.4.16 <0.9.0;

contract C {
    uint public data = 42;
}

contract Caller {
    C c = new C();
    function f() public view returns (uint) {
        return c.data();
    }
}
```

### Constants and immutable state variables

* `constant` - variables whose values ​​are fixed immediately upon compilation (put into contract bytecode).
* `immutable` - variables whose values ​​can be assigned during `construct`.

```solidity
// SPDX-License-Identifier: GPL-3.0
pragma solidity ^0.8.21;

uint constant X = 32**22 + 8;

contract C {
    string constant TEXT = "abc";
    bytes32 constant MY_HASH = keccak256("abc");
    uint immutable decimals = 18;
    uint immutable maxBalance;
    address immutable owner = msg.sender;

    constructor(uint decimals_, address ref) {
        if (decimals_ != 0)
            // Immutables are only immutable when deployed.
            // At construction time they can be assigned to any number of times.
            decimals = decimals_;

        // Assignments to immutables can even access the environment.
        maxBalance = ref.balance;
    }

    function isBalanceTooHigh(address other) public view returns (bool) {
        return other.balance > maxBalance;
    }
}
```

### Pure function

`function` does not read or change the state of the blockchain. Or used as a calculation `function`.

```solidity
// SPDX-License-Identifier: GPL-3.0
pragma solidity >=0.5.0 <0.9.0;

contract C {
    function f(uint a, uint b) public pure returns (uint) {
        return a * (b + 42);
    }
}
```

### Payable functions and addresses

```solidity
// SPDX-License-Identifier: MIT
pragma solidity ^0.8.24;

contract Payable {
    // Payable address can send Ether via transfer or send
    address payable public owner;

    // Payable constructor can receive Ether
    constructor() payable {
        owner = payable(msg.sender);
    }

    // Function to deposit Ether into this contract.
    // Call this function along with some Ether.
    // The balance of this contract will be automatically updated.
    function deposit() public payable {}

    // Call this function along with some Ether.
    // The function will throw an error since this function is not payable.
    function notPayable() public {}

    // Function to withdraw all Ether from this contract.
    function withdraw() public {
        // get the amount of Ether stored in this contract
        uint256 amount = address(this).balance;

        // send all Ether to owner
        (bool success,) = owner.call{value: amount}("");
        require(success, "Failed to send Ether");
    }

    // Function to transfer Ether from this contract to address from input
    function transfer(address payable _to, uint256 _amount) public {
        // Note that "to" is declared as payable
        (bool success,) = _to.call{value: _amount}("");
        require(success, "Failed to send Ether");
    }
}
```

### Receive Ether and Fallback function

A `contract` can have at most one `receive` function, declared using `receive() external payable { ... }` (without the `function` keyword). This `function` must have no `arguments`, cannot `return` anything and must have `external` visibility as well as `payable` `state mutability`. It can be `virtual`, it can be `override` and it can have `modifiers`.

```
    Which function is called, fallback() or receive()?

           send Ether
               |
         msg.data is empty?
              / \
            yes  no
            /     \
receive() exists?  fallback()
         /   \
        yes   no
        /      \
    receive()   fallback()
```

```solidity
// SPDX-License-Identifier: MIT
pragma solidity ^0.8.24;

contract Fallback {
    event Log(string func, uint256 gas);

    // Fallback function must be declared as external.
    fallback() external payable {
        // send / transfer (forwards 2300 gas to this fallback function)
        // call (forwards all of the gas)
        emit Log("fallback", gasleft());
    }

    // Receive is a variant of fallback that is triggered when msg.data is empty
    receive() external payable {
        emit Log("receive", gasleft());
    }

    // Helper function to check the balance of this contract
    function getBalance() public view returns (uint256) {
        return address(this).balance;
    }
}

contract SendToFallback {
    function transferToFallback(address payable _to) public payable {
        _to.transfer(msg.value);
    }

    function callFallback(address payable _to) public payable {
        (bool sent,) = _to.call{value: msg.value}("");
        require(sent, "Failed to send Ether");
    }
}
```

### Oracle

Oracle for smart contracts is a bridge between blockchain and the outside world. It provides data to smart contracts from sources outside the blockchain, such as APIs, market data, weather data, etc.

Here are some examples of how to use oracle for smart contracts:

* Providing price data for decentralized markets (DeFi): Oracle can provide price data for crypto assets, allowing traders to make trades on decentralized exchanges.
* Activate insurance contracts: Oracle can provide data about insurance events, such as accidents or natural disasters, to trigger insurance payments.
* Automate processes: Oracle can be used to automate processes, such as bill payment or supply chain management.

List of Oracles on Klaytn: <https://klaytn.foundation/ecosystem/?search=&cate=oracles-bridges&sort=abc>